
Affiliate Disclosure: This post may contain affiliate links, which means the American Crochet Association may earn a small commission from qualifying purchases made through links on our site, at no additional cost to you. Learn more on our Disclosures and Disclaimers page.
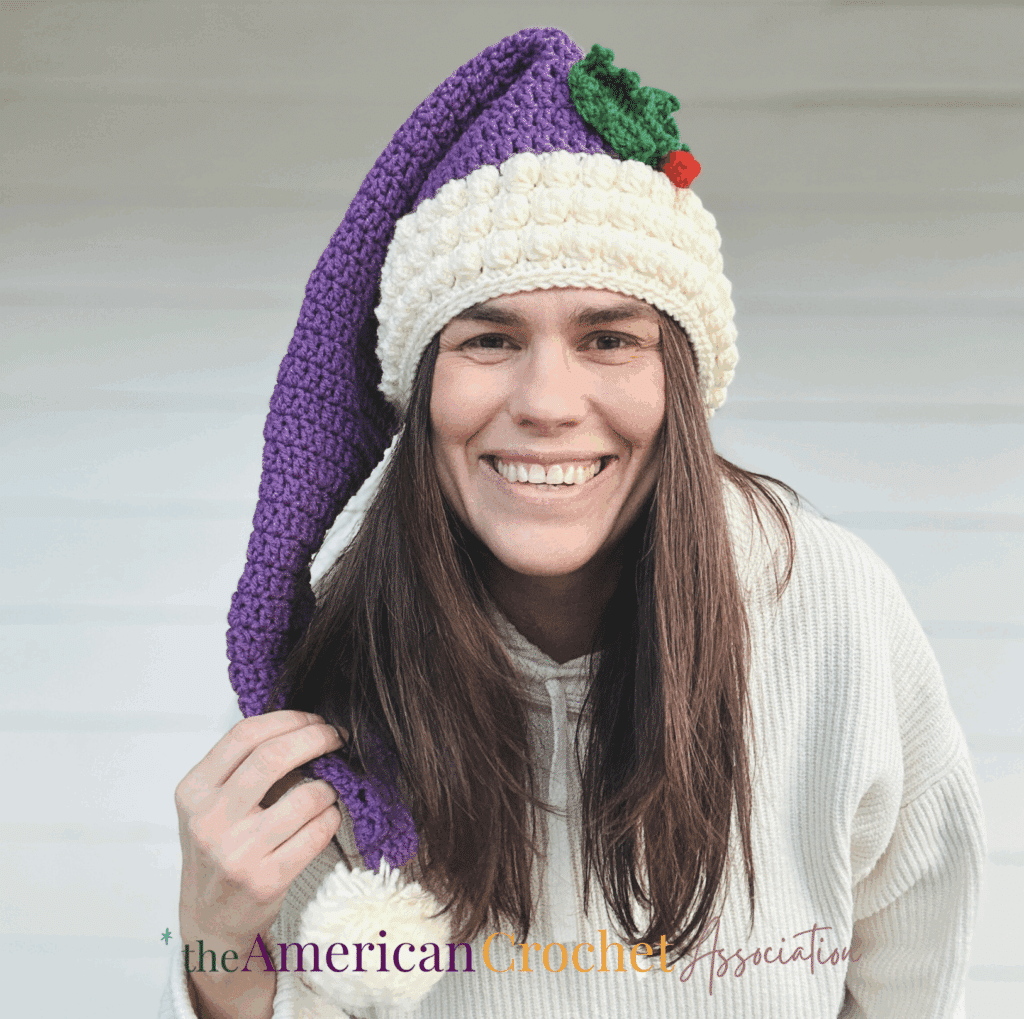
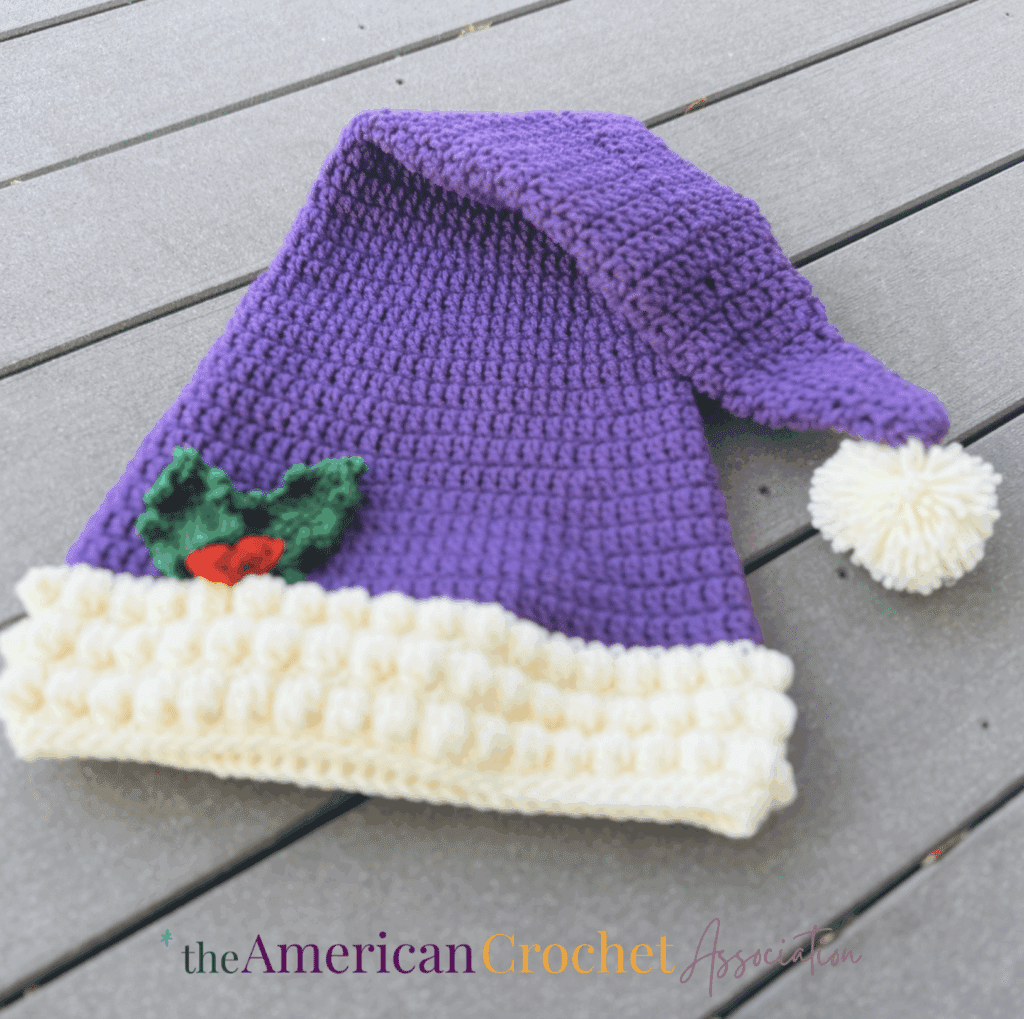
If you’re looking for a crochet Christmas hat that’s playful, cozy, and just a little bit extra, this long Crochet Santa hat pattern is exactly that.
I designed this crochet pattern to be a fun twist on a classic holiday staple — longer, with more drape, and full of texture that really shows off your stitches.
Because this is a gift for my sister (we both have Christmas birthdays), she asked me to crochet a long Santa hat in birthday colors (not traditional Christmas colors).
No matter what colors you choose, this is the kind of project that is really satisfying to make and so fun to wear (or gift) – The joy this long Santa hat brings people is magical!
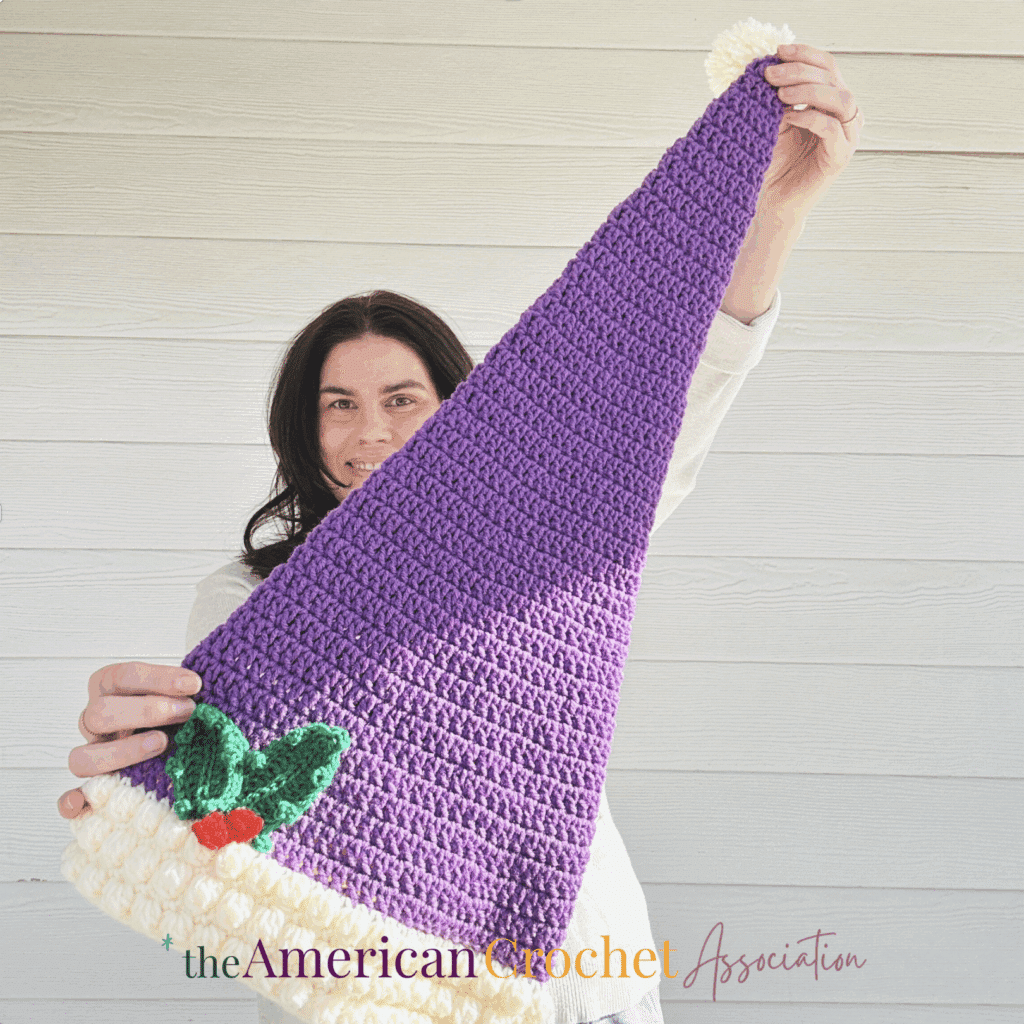
This long Santa hat works up with very basic stitches from the peak down to the brim, with strategic increases to create the classically long Santa hat design.
With multiple sizes included (18″ – 25″ in circumference), this hat is designed for teens, young adults, and adults.
Grab your yarn, settle in, and enjoy crocheting a festive holiday accessory that’s meant to be fun from first stitch to final pom-pom.
Estimated reading time: 13 minutes
Table of contents
This article may contain some affiliate links.
Policy for Individual Use
This long crochet santa hat pattern was designed by Salena Baca Crochet for the American Crochet Association.
Pattern instructions are protected by copyright laws.
Users must acknowledge and respect the intellectual property rights of pattern creators and designers as follows:
- This pattern is for personal use only. Pattern instructions may be accessed and used by individuals for personal, non-commercial purposes only. Users may create finished products based on the pattern instructions for personal use or gifting.
- Users may not reproduce, distribute, modify, or create derivative works of pattern instructions without explicit permission from the copyright holder.
- Selling or commercially exploiting products made from pattern instructions will require additional permissions or licensing from the copyright holder.
- It is unlawful to share or distribute pattern instructions in any way, including but not limited to: print, digital, video.
- It is unlawful to create derivative works based on pattern instructions, including but not limited to translations, adaptations, or variations.
- Users should provide proper attribution when sharing or displaying finished products made using these pattern instructions, giving credit to the original pattern creator and source.
- Users are expected to conduct themselves in an ethical and respectful manner when using pattern instructions. Users should not engage in plagiarism, claim others’ work as their own, or misrepresent the origin of pattern instructions.
By accessing and using pattern instructions, individuals agree to abide by the usage policy herein.
Users may be held responsible for any damages or legal liabilities resulting from their non-compliance with this policy.
Purchase a PDF File on Ravelry
For a copy of this crochet bandana pattern, you can purchase a downloadable PDF version on Ravelry.
More Long Crochet Santa Hat Resources
Finished Long Crochet Santa Hat Pattern Projects
Need some inspiration before you get started on this crochet project?
Check out other finished Long Santa Hat patterns on ravelry today, right here:

More Crochet Christmas Patterns
If you love the look of this Long Crochet Santa Hat, here are a few more Christmas inspired crochet patterns you can view on our website:
Crochet Santa Hat: Easy Pattern In 6 Sizes
Snowdrift Crochet Stocking Pattern
How to make this Long Crochet Santa Hat Pattern
Yarn
Red Heart Super Saver Yarn medium weight #4 yarn (100% Acrylic; 364 yds/333 m per 5 oz/141 g skein)
- Color D: Hot Red
- Color A: Lavender, 1 skein
- Color B: Aran, .25 skein
- Color C: Paddy Green
This Long Santa Hat pattern was made with a worsted weight yarn in 100% acrylic.
To find similar yarn weights, I suggest looking on yarnsub.com and comparing the yarn used to write this pattern.
If you choose to substitute yarn, think about the fabric you’re creating and be careful not to create fabric that is way too stiff, or way too light and soft – that way, you’ll have the right length and drape for your long Santa Hat.
Check out our Crochet Memberships for all skill levels!
From First Stitch to Crochet Career, Unravel Your Complete Journey With The American Crochet Association!
You can read more about how to substitute yarn, including my best tips to choose yarn alternatives, right here: Understanding Yarn Substitution – An Easy Reference For Crocheters
If you would like to substitute yarn for this project, here are some worsted weight yarns I recommend that have similar traditional Christmas colors, and other fun combinations:
Materials
Use a hook that best fits your yarn choice, or creates the type of fabric you would like to create (tight and firm or loose with lots of drape).
The sample pictured in this crochet bandana pattern was made with a US size H/8 5.00 mm crochet hook.
Gauge
- 14.5 pattern sts = 4”
- 4 pattern rows = 3.5”
To learn more about gauge and size in crochet, here are some helpful tips: How To Crochet a Swatch.
Finished Sizes and Measurements
- 18” around x 21” long
- 21.5” around x 25” long
- 25” around x 29” long
To learn more about measuring for the best size and fit (especially for something worn around the head), here are some helpful tips: Crochet Hat Size Chart and Calculator.
Stitch Key
This crochet stitch pattern is worked with the following basic crochet stitches.
You can see these stitches in action as you watch our video tutorials (just click on the underlined text):
- Sl St = slip stitch
- Ch(s) = chain(s)
- Sc = single crochet
- Hdc = half double crochet
- Dc = double crochet
- Sl St = slip stitch
- St(s) = stitch(es)
Specialty Stitches & Techniques
- Bobble = [yarn over, insert hook into 1 St, yarn over, pull back through St, yarn over, pull through 2 loops on hook] 4 times into same St, yarn over, pull through all 5 loops on hook. Tip: Pull the final loop tightly, pushing each bobble to the right side of the fabric so that they bulge outward.
- BLO = Back Loops Only
- Picot = Ch 4, Sl St into 4th Ch from hook.
- Popcorn = Work 5 Dc Sts into the same stitch or space, remove hook from loop, insert hook into top of first Dc of group, insert hook into empty loop, pull loop through St to close. Tip: Popcorn will be pronounced on the right side of the fabric.
You can view a general video tutorial for the Bobble and Popcorn stitches right here: Bobble Stitch Crochet and Beyond – How to Tell Textured Stitches Apart
With so many different places and spaces to work in crochet, it can be easy to wonder where you should place your hook to work specialty stitches.
Here are some tips and resources to help: Where Does My Hook Go in Crochet?
Pattern Notes
- Model has 22” head and is wearing size 25” around.
- Hat is worked from the peak toward the brim in one piece. Pompom and holly leaf motif made separately.
- To measure for your desired fit, use fabric tape measure around largest part of forehead. Follow size that 1-3” larger than actual measurement.
Long Crochet Santa Hat Pattern Instructions
Hat Instructions (All Sizes)
- Round 1 (Right Side): With Color A Ch 4, skip 3 Ch (first Dc), work 9 Dc into next Ch, Sl St into top of first Dc to join – 10 Dc
- Round 2-3: Ch 3 (first Dc, here and throughout), work 1 Dc into each St around, Sl St into top of first Dc to join – 10 Dc
- Round 4: Ch 3, Dc into same St, Dc into next St, [2 Dc into next St, Dc into following] around, Sl St into top of first Dc to join – 15 Dc
- Round 5-6: Ch 3 (first Dc, here and throughout), work 1 Dc into each St around, Sl St into top of first Dc to join – 15 Dc
- Round 7: Ch 3, Dc into same St, Dc into next 2 Sts, [2 Dc into next St, Dc into following 2 Sts] around, Sl St into top of first Dc to join – 20 Dc
- Round 8-9: Ch 3 (first Dc, here and throughout), work 1 Dc into each St around, Sl St into top of first Dc to join – 20 Dc
- Round 10: Ch 3, Dc into same St, Dc into next 3 Sts, [2 Dc into next St, Dc into following 3 Sts] around, Sl St into top of first Dc to join – 25 Dc
- Round 11-12: Ch 3 (first Dc, here and throughout), work 1 Dc into each St around, Sl St into top of first Dc to join – 25 Dc
- Round 13: Ch 3, Dc into same St, Dc into next 4 Sts, [2 Dc into next St, Dc into following 4 Sts] around, Sl St into top of first Dc to join – 30 Dc
- Round 14-15: Ch 3 (first Dc, here and throughout), work 1 Dc into each St around, Sl St into top of first Dc to join – 30 Dc
- Round 16: Ch 3, Dc into same St, Dc into next 5 Sts, [2 Dc into next St, Dc into following 5 Sts] around, Sl St into top of first Dc to join – 35 Dc
- Round 17-18: Ch 3 (first Dc, here and throughout), work 1 Dc into each St around, Sl St into top of first Dc to join – 35 Dc
- Round 19: Ch 3, Dc into same St, Dc into next 6 Sts, [2 Dc into next St, Dc into following 6 Sts] around, Sl St into top of first Dc to join – 40 Dc
- Round 20-21: Ch 3 (first Dc, here and throughout), work 1 Dc into each St around, Sl St into top of first Dc to join – 40 Dc
- Round 22: Ch 3, Dc into same St, Dc into next 7 Sts, [2 Dc into next St, Dc into following 7 Sts] around, Sl St into top of first Dc to join – 45 Dc
- Round 23-24: Ch 3 (first Dc, here and throughout), work 1 Dc into each St around, Sl St into top of first Dc to join – 45 Dc
- Round 25: Ch 3, Dc into same St, Dc into next 8 Sts, [2 Dc into next St, Dc into following 8 Sts] around, Sl St into top of first Dc to join – 50 Dc
- Round 26-27: Ch 3 (first Dc, here and throughout), work 1 Dc into each St around, Sl St into top of first Dc to join – 50 Dc
Size 18” only – Fasten off Color A, continue to section for individual size.
- Round 28: Ch 3, Dc into same St, Dc into next 9 Sts, [2 Dc into next St, Dc into following 9 Sts] around, Sl St into top of first Dc to join – 55 Dc
- Round 29-30: Ch 3 (first Dc, here and throughout), work 1 Dc into each St around, Sl St into top of first Dc to join – 55 Dc
- Round 31: Ch 3, Dc into same St, Dc into next 10 Sts, [2 Dc into next St, Dc into following 10 Sts] around, Sl St into top of first Dc to join – 60 Dc
- Round 32-33: Ch 3 (first Dc, here and throughout), work 1 Dc into each St around, Sl St into top of first Dc to join – 60 Dc
Size 21.5” only – Fasten off Color A, continue to section for individual size.
- Round 34: Ch 3, Dc into same St, Dc into next 11 Sts, [2 Dc into next St, Dc into following 11 Sts] around, Sl St into top of first Dc to join – 65 Dc
- Round 35-36: Ch 3 (first Dc, here and throughout), work 1 Dc into each St around, Sl St into top of first Dc to join – 65 Dc
- Round 37: Ch 3, Dc into same St, Dc into next 12 Sts, [2 Dc into next St, Dc into following 12 Sts] around, Sl St into top of first Dc to join – 70 Dc
- Round 38-39: Ch 3 (first Dc, here and throughout), work 1 Dc into each St around, Sl St into top of first Dc to join – 70 Dc
Size 25”: Fasten off Color A, continue to section for individual size.
18” Long Santa Hat
- Round 28: With Color B Ch 1 (not a St, here and throughout), work 1 Sc into each St around, Sl St into top of first St to join – 50 Sc
- Round 29: Ch 1, [Sc, Bobble into next St] around, Sl St into top of first St to join – 50 Sts; 25 Sc + 25 Bobble
Repeat rounds 28-29 until 34 rounds are complete (ending on a round 28 repeat).
- Round 35: Sl St into BLO of each St around, fasten off – 50 Sl Sts
21.5” Long Santa Hat
- Round 34: With Color B Ch 1 (not a St, here and throughout), work 1 Sc into each St around, Sl St into top of first St to join – 60 Sc
- Round 35: Ch 1, [Sc, Bobble into next St] around, Sl St into top of first St to join – 60 Sts; 30 Sc + 30 Bobble
Repeat rounds 34-35 until 40 rounds are complete (ending on a round 34 repeat).
- Round 41: Sl St into BLO of each St around, fasten off – 60 Sl Sts
25” Long Santa Hat
- Round 40: With Color B Ch 1 (not a St, here and throughout), work 1 Sc into each St around, Sl St into top of first St to join – 70 Sc
- Round 41: Ch 1, [Sc, Bobble into next St] around, Sl St into top of first St to join – 70 Sts; 35 Sc + 35 Bobble
Repeat rounds 40-41 until 46 rounds are complete (ending on a round 40 repeat).
- Round 47: Sl St into BLO of each St around, fasten off – 70 Sl Sts
Holly Leaf (Make 2)
With Color C, leave a 20” long tail, Ch 11 (base Ch).
- Row 1 (Right Side): Skip 1 Ch (not a St), Sc, Picot, Hdc, Dc, Dc, Picot, Dc, Dc, Dc, Picot, Dc, Hdc, Sc, Picot. Rotate to work across opposite side of base Ch. Sc, Hdc, Dc, Picot, Dc, Dc, Dc, Picot, Dc, Dc, Hdc, Picot, (Sc, Sl St) into last Ch, fasten off 20” long tail – 27 Sts; 4 Sc + 7 Picot + 4 Hdc + 12 Dc
Position leaves to hat, as pictured in example. Using 20” long tail ends, sew each Holly Leaf to hat along the center (base Ch).
Holly Berry
With Color D, leave a 12” long tail, Ch 3.
- Row 1: Skip 2 Ch, work the following into 3rd Ch from hook: Popcorn, Ch 2, Sl St, Ch 2, Popcorn, Ch 2, Sl St, fasten off 12” long tail – 4 Ch-2 spaces + 2 Popcorn + 2 Sl Sts
Using 12” long tail ends, knot Holly Berry at base of Holly Leaves.
Finishing:
- With Color B, use a 3” pom-pom maker to make one pom-pom, attach it to Round 1 of hat.
- Sew in all ends, trim excess.
How to wear this Long Santa Hat
Here’s a quick video demonstration from the author Salena Baca showing you how to wear this long Santa Hat, and how a 25″ hat size looks on a 22″ head size.
Click Here to share your finished project in our community!
Peace + Love + Crochet
Salena
Selena, I just love your long Santa hat as a birthday hat. I also was a Christmas baby like your sister. It’s really a small world. Your sister is going to love the hat. I look forward to making one for next year. Have a blessed Christmas Holiday!! Sandra