
Affiliate Disclosure: This post may contain affiliate links, which means the American Crochet Association may earn a small commission from qualifying purchases made through links on our site, at no additional cost to you. Learn more on our Disclosures and Disclaimers page.
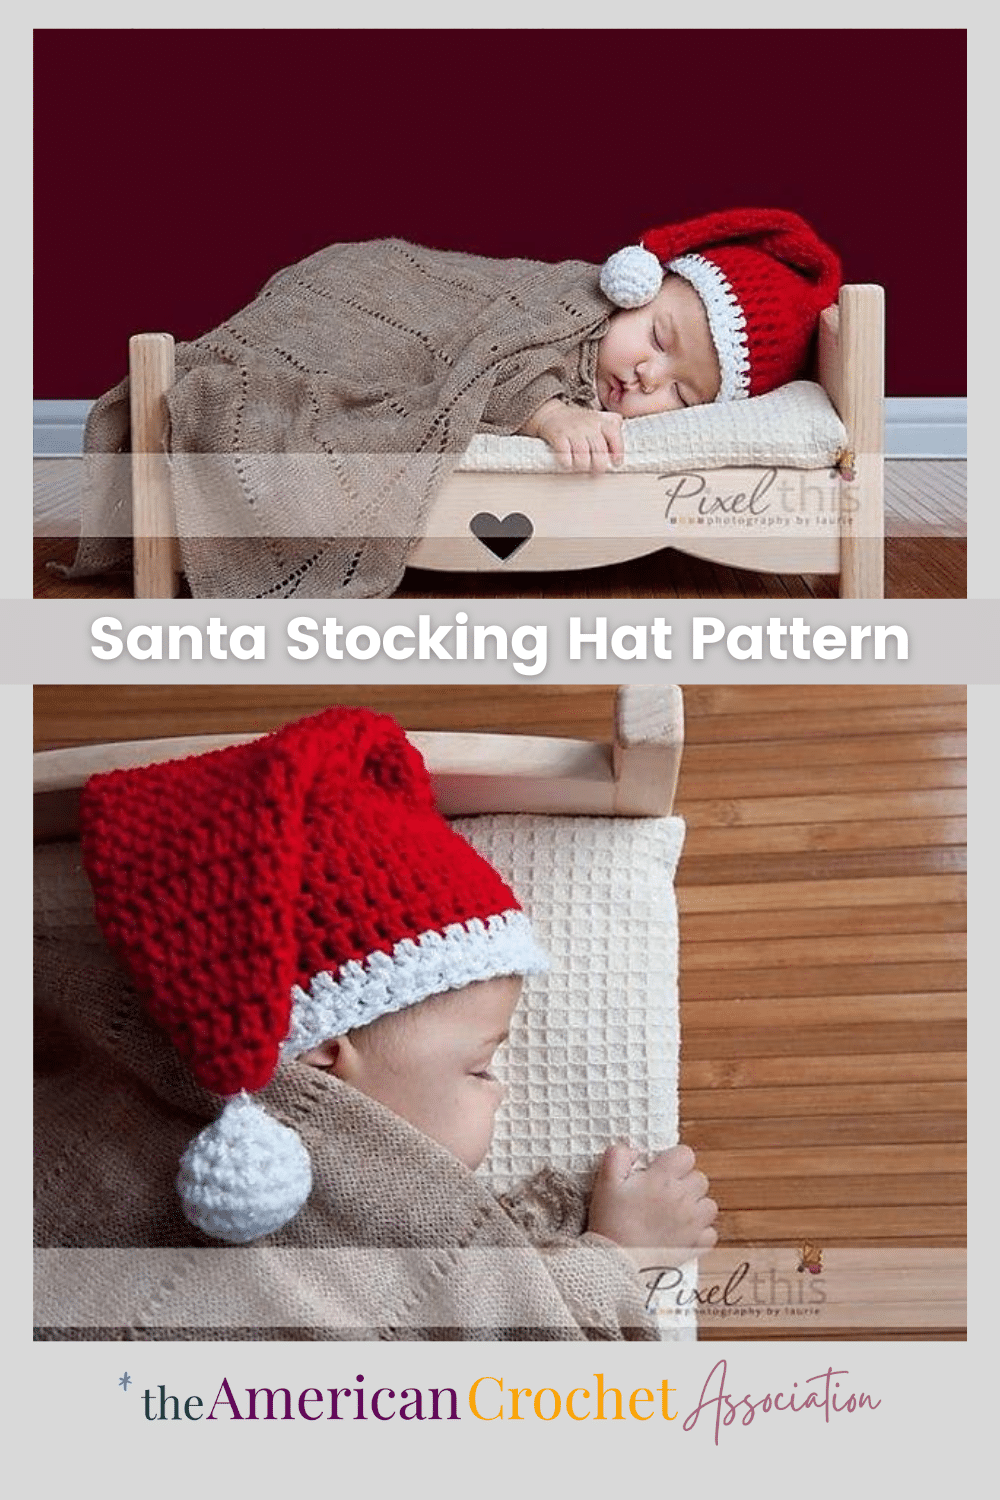
If you’re looking for a cute Crochet Santa Hat for the holiday season, or a fun costume idea for a photo prop, this pattern uses really basic stitches to create the perfect stocking hat in six different sizes!
The Crochet Santa Stocking Hat is worked in joined rounds from the top down, and uses simple stitch increases that are really easy to follow along (even if you’re a beginner).
The gradual increasing of stitches in this hat style results in a long triangle shape that perfectly flops over to the side when worn.
Finally, a Santa hat would not be complete without a crocheted ball added to the very tip of the hat, with a matching brim around the last few rounds, in perfect shades of holiday red and white.
If you would rather skip the crochet ball at the end, I understand; you can just add a tassel or pom pom to finish off this accessory and still create the perfect Santa style crochet hat.
Don’t worry about choosing the perfect yarn for this project – the exact colors for each section of this Santa Hat can be found online, and I’ll share my favorite links!
This crochet stocking pattern is written in six different sizes that are sectioned out individually and easy to follow along.
If you’re looking for the cutest creative accessory this holiday season, the Crochet Santa Stocking Hat is the perfect project to work up, for beginners and seasoned crocheters alike:
- The Santa stocking hat style is a quick and easy crochet hat to work up (even if you’re new to crochet)!
- This makes a great photography prop and holiday costume!
- This project was designed for worsted weight yarn, which is one of the most common and accessible yarns in crochet!
- You’ll get to practice a lot of crochet skills: joined rounds, stitch tension, gauge & size, increasing, color changes, finishing techniques & more!
Grab your crochet hook and turn up the Christmas music to start crocheting your very own Santa Style Stocking Hat today.
This post may contain affiliate links.
Table of contents
Estimated reading time: 20 minutes

Introduction
What is a Santa Stocking Hat?
A Santa stocking hat, Santa hat, or Christmas hat is a festive accessory iconically attributed to Santa Claus in America.
This style of hat is characterized by its red color, white trim, and a fluffy white pom-pom or ball at the very tip.
The traditional Santa stocking hat is based on a depiction of Santa Claus in popular culture, where he is often portrayed wearing a matching red suit with white trim.
This style of hat has become a symbol of the Christmas season, and is commonly worn by people of all ages as a playful and joyful accessory during holiday festivities.
Is the Santa Crochet Hat just for Christmas?
While the classic red and white colors are iconic during the holiday season, the whimsical and comfy design of this stocking hat mean that it can be worn way beyond Christmas.
As playful as this Santa Crochet hat is, simply changing the yarn colors will transform this into more than just a holiday costume.
By substituting the classic red and white colors, this Crochet Santa hat can easily become a unique and fun accessory that can be worn year round, and here are some examples:
- Choose your favorite colors to match your coat or jacket!
- Use a self-striping yarn with lots of different colors!
- Change the crochet ball for a pompom or tassel!
- Use different textures of yarn to create an even more unique look.
How many sizes are included?
This crochet Santa Hat is an accessory that particularly suites newborn infants (about 11.5″ head circumference) up to pre-teens (about 19″ head circumference), so the pattern is written in six different sizes in that range:
- 11.5” around x 9.5” tall
- 13” around x 10.5” tall
- 14.5” around x 11.5” tall
- 16” around x 12.5” tall
- 17.5” around x 13.5” tall
- 19” around x 14.5” tall
To make the best fitting Crochet Santa hat, start by measuring the head, and then pick a size (around, for circumference) based on that measurement.
I’ve created a list of the most popular hat sizes (from Newborn 12″ up to Adult Large 24″), complete with tips to measure for the best fit, in What Size Hat To Make: Easy Guide For Crochet.
Selecting the Perfect Yarn
What yarn should I use?
This crochet pattern was first made in 2010, and published in the winter of 2015, with Bernat Super Value Solids.
Thankfully, Bernat Super Value Solids is still in production to this day, and even offer the exact same colors photographed, so this pattern can be followed exactly to make the same results.
And, if you’re looking to change up the classic Santa red and white, Bernat Super Value Solids has a few other colors I recommend you try:
- Burgundy – A deeper red color, for a more vintage Santa look.
- Lush – A vibrant green color, for a modern “Santa’s Elf” look.
- Taupe Heather – A rustic brown color, for a natural woodland look.
How can I choose a yarn substitute?
As you choose yarn for a project like this, getting the right weight of yarn, and the right colors, are important features, and Bernat Super Value Solids has quite a few close matches you can try.
Bernat Super Value Solids is a yarn that can easily be substituted, and you can likely find other similar weights in your favorite local yarn shop.
If you need to look for a substitute, I suggest first checking YarnSub.com — they’ve got at least eight yarns that are a 99% match to Bernat Super Value solids, and here are some yarns I recommend you review first:
To find the perfect yarn for your Crochet Santa Hat, I suggest starting with the same weight yarn and make a test swatch to see if it can give you the same stitch and row size results.
Be sure to note that your stitch and row measurements for this pattern should match the pattern gauge so that you can crochet the right size hat.
Learn more when you read through my best tips: Understanding Yarn Substitution – An Easy Reference For Crocheters.
Check out our Crochet Memberships for all skill levels!
From First Stitch to Crochet Career, Unravel Your Complete Journey With The American Crochet Association!
Helpful Resources
Project Inspiration
You can view a variety of other finished Santa Crochet Hats on ravelry, to see how this style looks on different ages, works up in different yarns and in different colors and styles.

How To Crochet In Joined Rounds
This Santa crochet hat is worked in one piece, from the peak all the way down to the brim.
To get the triangular look of a Santa Hat, you’ll increase the stitch count by following a specific pattern for the exact size you need.
If you’re still building your crochet skills and need some help working in joined rounds, watch my video tutorial How To Crochet In Joined Rounds and Increase.
Even though this is not an exact tutorial for this pattern, there are helpful tips about what counts as a stitch, how to use stitch markers, and where to join at the end of each round.
How To Change Color In Joined Rounds
A classic Santa Hat is made with red and white, so you’ll have to change your yarn color at least one time in this pattern to get that same look.
If you’re not sure how to change color in joined rounds of crochet, my favorite tips can be viewed in our quick video tutorial How To Double Crochet in Rounds and do a Color Change.
Please note that this is not an exact tutorial for this pattern, but there are helpful tips about how to change colors when working in joined rounds of crochet.
Fun Crochet Hat Patterns
If you love the classic design of this Santa Crochet Hat and would like to see other fun styles we have a few more you can view, including these popular patterns, right here:
Policy for Individual Use
This crochet pattern is designed by Salena Baca Crochet for the American Crochet Association.
Pattern instructions are protected by copyright laws.
Users must acknowledge and respect the intellectual property rights of pattern creators and designers as follows:
- This pattern is for personal use only. Pattern instructions may be accessed and used by individuals for personal, non-commercial purposes only. Users may create finished products based on the pattern instructions for personal use or gifting.
- Users may not reproduce, distribute, modify, or create derivative works of pattern instructions without explicit permission from the copyright holder.
- Selling or commercially exploiting products made from pattern instructions will require additional permissions or licensing from the copyright holder.
- It is unlawful to share or distribute pattern instructions in any way, including but not limited to: print, digital, video.
- It is unlawful to create derivative works based on pattern instructions, including but not limited to translations, adaptations, or variations.
- Users should provide proper attribution when sharing or displaying finished products made using these pattern instructions, giving credit to the original pattern creator and source.
- Users are expected to conduct themselves in an ethical and respectful manner when using pattern instructions. Users should not engage in plagiarism, claim others’ work as their own, or misrepresent the origin of pattern instructions.
By accessing and using pattern instructions, individuals agree to abide by the usage policy herein.
Users may be held responsible for any damages or legal liabilities resulting from their non-compliance with this policy.
Purchase a PDF file on Ravelry
Click Here to purchase a downloadable PDF version of this pattern!
Making the Santa Crochet Hat
Yarn
Bernat Super Value Solids, Medium weight #4 yarn (100% Acrylic; 275 yds/251 m per 5 oz/142 g skein):
Materials
- US Size H8 / 5.00 mm) crochet hook
- Yarn Needle
- Measuring Tape
- 1 cup Poly-Fill (for crochet ball)
Stitch Key
- Ch(s) = chain(s)
- Sc = single crochet
- Hdc = half double crochet
- St(s) = stitch(es)
- Sl St = slip stitch
Specialty Stitches and Techniques
Sizes and Finished Dimensions
- 11.5” around x 9.5” tall
- 13” around x 10.5” tall
- 14.5” around x 11.5” tall
- 16” around x 12.5” tall
- 17.5” around x 13.5” tall
- 19” around x 14.5” tall
Gauge
- 13 pattern Sts = 4”
- 8 pattern rows = 4”
Pattern Notes
- The crochet ball is worked in just one size, and may be used for all hat sizes included in this pattern.

Instructions
11.5” Hat Size
- Round 1 (Right Side): With A, form an adjustable loop, Ch 1 (Not a St, now and throughout), work 10 HDc into loop, Sl St to join – 10 HDc
- Round 2: Ch 1, HDc into each St around, Sl St to join – 10 HDc
- Round 3: Ch 1, [HDc, work 2 HDc into next St] around, Sl St to join – 15 HDc
- Round 4: Ch 1, HDc into each St around, Sl St to join – 15 HDc
- Round 5: Ch 1, [HDc into first 2 Sts, 2 HDc into next] around, Sl St to join – 20 HDc
- Round 6: Ch 1, HDc into each St around, Sl St to join – 20 HDc
- Round 7: Ch 1, [HDc into first 3 Sts, 2 HDc into next] around, Sl St to join – 25 HDc
- Round 8: Ch 1, HDc into each St around, Sl St to join – 25 HDc
- Round 9: Ch 1, [HDc into first 4 Sts, 2 HDc into next] around, Sl St to join – 30 HDc
- Round 10: Ch 1, HDc into each St around, Sl St to join – 30 HDc
- Round 11: Ch 1, [HDc into first 5 Sts, 2 HDc into next] around, Sl St to join – 35 HDc
- Round 12: Ch 1, HDc into each St around, Sl St to join – 35 HDc
- Round 13: Ch 1, [HDc into first 6 Sts, 2 HDc into next] around, Sl St to join – 40 HDc
- Round 14-18: Ch 1, HDc into each St around, Sl St to join – 40 HDc
- Round 19: With B, Ch 1, Sc into each St around, Sl St to join – 40 Sc
Repeat round 19 once more, fasten off.
13” Hat Size
- Round 1 (Right Side): With A, form an adjustable loop, Ch 1 (Not a St, now and throughout), work 10 HDc into loop, Sl St to join – 10 HDc
- Round 2: Ch 1, HDc into each St around, Sl St to join – 10 HDc
- Round 3: Ch 1, [HDc, work 2 HDc into next St] around, Sl St to join – 15 HDc
- Round 4: Ch 1, HDc into each St around, Sl St to join – 15 HDc
- Round 5: Ch 1, [HDc into first 2 Sts, 2 HDc into next] around, Sl St to join – 20 HDc
- Round 6: Ch 1, HDc into each St around, Sl St to join – 20 HDc
- Round 7: Ch 1, [HDc into first 3 Sts, 2 HDc into next] around, Sl St to join – 25 HDc
- Round 8: Ch 1, HDc into each St around, Sl St to join – 25 HDc
- Round 9: Ch 1, [HDc into first 4 Sts, 2 HDc into next] around, Sl St to join – 30 HDc
- Round 10: Ch 1, HDc into each St around, Sl St to join – 30 HDc
- Round 11: Ch 1, [HDc into first 5 Sts, 2 HDc into next] around, Sl St to join – 35 HDc
- Round 12: Ch 1, HDc into each St around, Sl St to join – 35 HDc
- Round 13: Ch 1, [HDc into first 6 Sts, 2 HDc into next] around, Sl St to join – 40 HDc
- Round 14: Ch 1, HDc into each St around, Sl St to join – 40 HDc
- Round 15: Ch 1, [HDc into first 7 Sts, 2 HDc into next] around, Sl St to join – 45 HDc
- Round 16: Ch 1, HDc into each St around, Sl St to join – 45 HDc
- Round 17-20: Ch 1, HDc into each St around, Sl St to join – 45 HDc
- Round 21: With B, Ch 1, Sc into each St around, Sl St to join – 45 Sc
Repeat round 21 once more, fasten off.
14.5” Hat Size
- Round 1 (Right Side): With A, form an adjustable loop, Ch 1 (Not a St, now and throughout), work 10 HDc into loop, Sl St to join – 10 HDc
- Round 2: Ch 1, HDc into each St around, Sl St to join – 10 HDc
- Round 3: Ch 1, [HDc, work 2 HDc into next St] around, Sl St to join – 15 HDc
- Round 4: Ch 1, HDc into each St around, Sl St to join – 15 HDc
- Round 5: Ch 1, [HDc into first 2 Sts, 2 HDc into next] around, Sl St to join – 20 HDc
- Round 6: Ch 1, HDc into each St around, Sl St to join – 20 HDc
- Round 7: Ch 1, [HDc into first 3 Sts, 2 HDc into next] around, Sl St to join – 25 HDc
- Round 8: Ch 1, HDc into each St around, Sl St to join – 25 HDc
- Round 9: Ch 1, [HDc into first 4 Sts, 2 HDc into next] around, Sl St to join – 30 HDc
- Round 10: Ch 1, HDc into each St around, Sl St to join – 30 HDc
- Round 11: Ch 1, [HDc into first 5 Sts, 2 HDc into next] around, Sl St to join – 35 HDc
- Round 12: Ch 1, HDc into each St around, Sl St to join – 35 HDc
- Round 13: Ch 1, [HDc into first 6 Sts, 2 HDc into next] around, Sl St to join – 40 HDc
- Round 14: Ch 1, HDc into each St around, Sl St to join – 40 HDc
- Round 15: Ch 1, [HDc into first 7 Sts, 2 HDc into next] around, Sl St to join – 45 HDc
- Round 16: Ch 1, HDc into each St around, Sl St to join – 45 HDc
- Round 17: Ch 1, [HDc into first 8 Sts, 2 HDc into next] around, Sl St to join – 50 HDc
- Round 18-22: Ch 1, HDc into each St around, Sl St to join – 50 HD
- Round 23: With B, Ch 1, Sc into each St around, Sl St to join – 45 Sc
Repeat round 23 once more, fasten off.
16” Hat Size
- Round 1 (Right Side): With A, form an adjustable loop, Ch 1 (Not a St, now and throughout), work 10 HDc into loop, Sl St to join – 10 HDc
- Round 2: Ch 1, HDc into each St around, Sl St to join – 10 HDc
- Round 3: Ch 1, [HDc, work 2 HDc into next St] around, Sl St to join – 15 HDc
- Round 4: Ch 1, HDc into each St around, Sl St to join – 15 HDc
- Round 5: Ch 1, [HDc into first 2 Sts, 2 HDc into next] around, Sl St to join – 20 HDc
- Round 6: Ch 1, HDc into each St around, Sl St to join – 20 HDc
- Round 7: Ch 1, [HDc into first 3 Sts, 2 HDc into next] around, Sl St to join – 25 HDc
- Round 8: Ch 1, HDc into each St around, Sl St to join – 25 HDc
- Round 9: Ch 1, [HDc into first 4 Sts, 2 HDc into next] around, Sl St to join – 30 HDc
- Round 10: Ch 1, HDc into each St around, Sl St to join – 30 HDc
- Round 11: Ch 1, [HDc into first 5 Sts, 2 HDc into next] around, Sl St to join – 35 HDc
- Round 12: Ch 1, HDc into each St around, Sl St to join – 35 HDc
- Round 13: Ch 1, [HDc into first 6 Sts, 2 HDc into next] around, Sl St to join – 40 HDc
- Round 14: Ch 1, HDc into each St around, Sl St to join – 40 HDc
- Round 15: Ch 1, [HDc into first 7 Sts, 2 HDc into next] around, Sl St to join – 45 HDc
- Round 16: Ch 1, HDc into each St around, Sl St to join – 45 HDc
- Round 17: Ch 1, [HDc into first 8 Sts, 2 HDc into next] around, Sl St to join – 50 HDc
- Round 18: Ch 1, HDc into each St around, Sl St to join – 50 HDc
- Round 19: Ch 1, [HDc into first 9 Sts, 2 HDc into next] around, Sl St to join – 55 HDc
- Round 20-24: Ch 1, HDc into each St around, Sl St to join – 55 HDc
- Round 25: With B, Ch 1, Sc into each St around, Sl St to join – 55 Sc
Repeat round 25 once more, fasten off.
17.5” Hat Size
- Round 1 (Right Side): With A, form an adjustable loop, Ch 1 (Not a St, now and throughout), work 10 HDc into loop, Sl St to join – 10 HDc
- Round 2: Ch 1, HDc into each St around, Sl St to join – 10 HDc
- Round 3: Ch 1, [HDc, work 2 HDc into next St] around, Sl St to join – 15 HDc
- Round 4: Ch 1, HDc into each St around, Sl St to join – 15 HDc
- Round 5: Ch 1, [HDc into first 2 Sts, 2 HDc into next] around, Sl St to join – 20 HDc
- Round 6: Ch 1, HDc into each St around, Sl St to join – 20 HDc
- Round 7: Ch 1, [HDc into first 3 Sts, 2 HDc into next] around, Sl St to join – 25 HDc
- Round 8: Ch 1, HDc into each St around, Sl St to join – 25 HDc
- Round 9: Ch 1, [HDc into first 4 Sts, 2 HDc into next] around, Sl St to join – 30 HDc
- Round 10: Ch 1, HDc into each St around, Sl St to join – 30 HDc
- Round 11: Ch 1,[HDc into first 5 Sts, 2 HDc into next] around, Sl St to join – 35 HDc
- Round 12: Ch 1, HDc into each St around, Sl St to join – 35 HDc
- Round 13: Ch 1, [HDc into first 6 Sts, 2 HDc into next] around, Sl St to join – 40 HDc
- Round 14: Ch 1, HDc into each St around, Sl St to join – 40 HDc
- Round 15: Ch 1, [HDc into first 7 Sts, 2 HDc into next] around, Sl St to join – 45 HDc
- Round 16: Ch 1, HDc into each St around, Sl St to join – 45 HDc
- Round 17: Ch 1, [HDc into first 8 Sts, 2 HDc into next] around, Sl St to join – 50 HDc
- Round 18: Ch 1, HDc into each St around, Sl St to join – 50 HDc
- Round 19: Ch 1,[HDc into first 9 Sts, 2 HDc into next] around, Sl St to join – 55 HDc
- Round 20: Ch 1, HDc into each St around, Sl St to join – 55 HDc
- Round 21: Ch 1, [HDc into first 10 Sts, 2 HDc into next] around, Sl St to join – 60 HDc
- Round 22-26: Ch 1, HDc into each St around, Sl St to join – 60 HDc
- Round 27: With B, Ch 1, Sc into each St around, Sl St to join – 60 Sc
Repeat round 27 once more, fasten off.
19” Hat Size
- Round 1 (Right Side): With A, form an adjustable loop, Ch 1 (Not a St, now and throughout), work 10 HDc into loop, Sl St to join – 10 HDc
- Round 2: Ch 1, HDc into each St around, Sl St to join – 10 HDc
- Round 3: Ch 1, [HDc, work 2 HDc into next St] around, Sl St to join – 15 HDc
- Round 4: Ch 1, HDc into each St around, Sl St to join – 15 HDc
- Round 5: Ch 1, [HDc into first 2 Sts, 2 HDc into next] around, Sl St to join – 20 HDc
- Round 6: Ch 1, HDc into each St around, Sl St to join – 20 HDc
- Round 7: Ch 1, [HDc into first 3 Sts, 2 HDc into next] around, Sl St to join – 25 HDc
- Round 8: Ch 1, HDc into each St around, Sl St to join – 25 HDc
- Round 9: Ch 1, [HDc into first 4 Sts, 2 HDc into next] around, Sl St to join – 30 HDc
- Round 10: Ch 1, HDc into each St around, Sl St to join – 30 HDc
- Round 11: Ch 1, [HDc into first 5 Sts, 2 HDc into next] around, Sl St to join – 35 HDc
- Round 12: Ch 1, HDc into each St around, Sl St to join – 35 HDc
- Round 13: Ch 1, [HDc into first 6 Sts, 2 HDc into next] around, Sl St to join – 40 HDc
- Round 14: Ch 1, HDc into each St around, Sl St to join – 40 HDc
- Round 15: Ch 1, [HDc into first 7 Sts, 2 HDc into next] around, Sl St to join – 45 HDc
- Round 16: Ch 1, HDc into each St around, Sl St to join – 45 HDc
- Round 17: Ch 1, [HDc into first 8 Sts, 2 HDc into next] around, Sl St to join – 50 HDc
- Round 18: Ch 1, HDc into each St around, Sl St to join – 50 HDc
- Round 19: Ch 1, [HDc into first 9 Sts, 2 HDc into next] around, Sl St to join – 55 HDc
- Round 20: Ch 1, HDc into each St around, Sl St to join – 55 HDc
- Round 21: Ch 1, [HDc into first 10 Sts, 2 HDc into next] around, Sl St to join – 60 HDc
- Round 22: Ch 1, HDc into each St around, Sl St to join – 60 HDc
- Round 23: Ch 1, [HDc into first 11 Sts, 2 HDc into next] around, Sl St to join – 65 HDc
- Round 24-28: Ch 1, HDc into each St around, Sl St to join – 65 HDc
- Round 29: With B, Ch 1, Sc into each St around, Sl St to join – 65 Sc
- Repeat round 29 once more, fasten off.
Ball (All Sizes; Make 2)
- Round 1 (Right Side): With B, form adjustable loop, Ch 1 (not a St, here and throughout), work 6 Sc into loop, Sl St to join – 6 Sc
- Round 2: Ch 1, work 2 Sc into each St around, Sl St to join – 12 Sc
- Round 3: Ch 1, [Sc, work 2 Sc into next St] 6 times, Sl St to join – 18 Sc
- Round 4: Ch 1, [Sc into first 2 sts, work 2 Sc into following] 6 times, Sl St to join, fasten off – 24 Sc
With Right Sides facing outward, align ball halves together at last round worked.
Thread 12” of color B on yarn needle, sew halves together more than half way.
Stuff with Poly-Fill (enough to make ball round).
Sew halves together until closed, fasten off.
Thread 12” Color B on yarn needle; Sew round 1 of Ball (either end) to round 1 of hat. Fasten off.
Finishing
Sew in all ends, trim excess.
Video Chat
To hear more about this crochet Santa hat pattern from the designer, watch this quick video chat!
Click Here to share your finished project in our community!
Peace + Love + Crochet
Salena
Row 3 is not equaling to total of 15 stitches. Is the count wrong by chance? I end up total of 11. Please help!!
When you follow the stitch repeat within the brackets from [ to ] all the way around, you will get the indicated stitch count. Enjoy!