
Affiliate Disclosure: This post may contain affiliate links, which means the American Crochet Association may earn a small commission from qualifying purchases made through links on our site, at no additional cost to you. Learn more on our Disclosures and Disclaimers page.
If you love to make your very own holiday decorations, give this quick and easy crochet stocking a try this Christmas!
Crochet stockings allow you to express your love for yarn, help you to create personalized gifts for your loved ones, and create traditions that will be treasured for years to come.
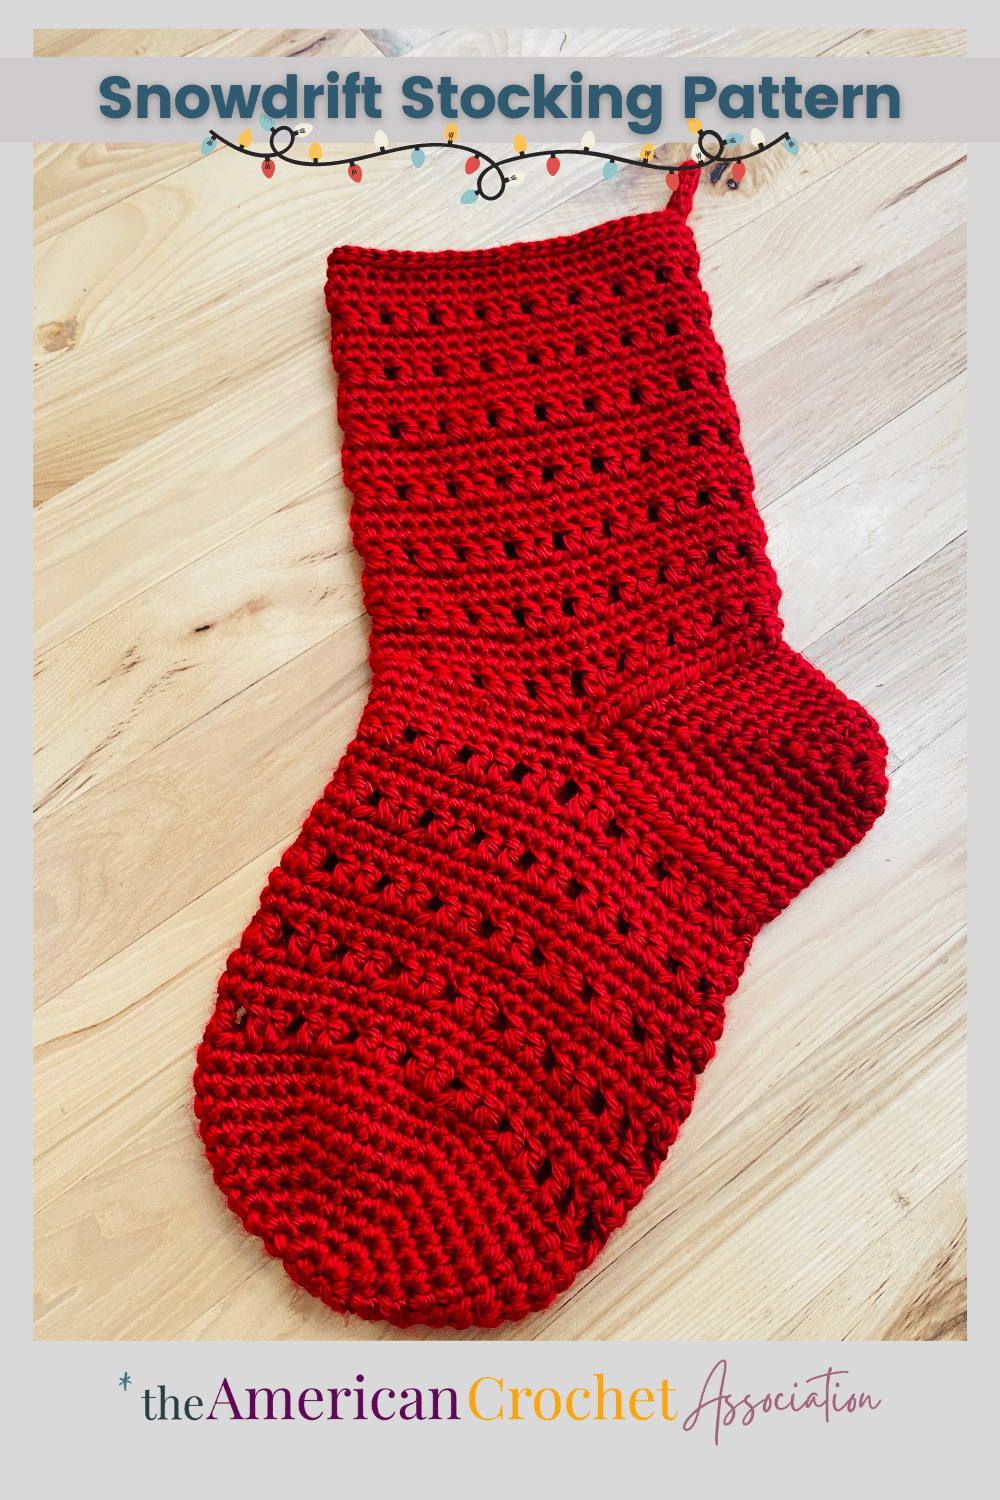
Introducing the Snowdrift Christmas Stocking; a project that comes together effortlessly in just two pieces!
Using only basic crochet stitches such as chain, single crochet, double crochet, and slip stitch, this is a straightforward pattern.
The use of repeating stitch rounds alternates to create a delightful combination of solid and open fabric, resembling the serene appearance of a snowdrift on a winter day.
And finally, the Snowdrift Crochet Stocking is a great design to work up this holiday season because:
- You can use yarn you already have on hand!
- These make great gifts for the holiday season!
- These projects use very little yarn, so they’re great stash-busters!
- You’ll get to practice a lot of crochet skills: Yarn and color choice, joined rounds, simple stitch and round repeats, shaping, seaming pieces together, finishing techniques & more!
Estimated reading time: 12 minutes
Table of contents
This post may contain affiliate links.
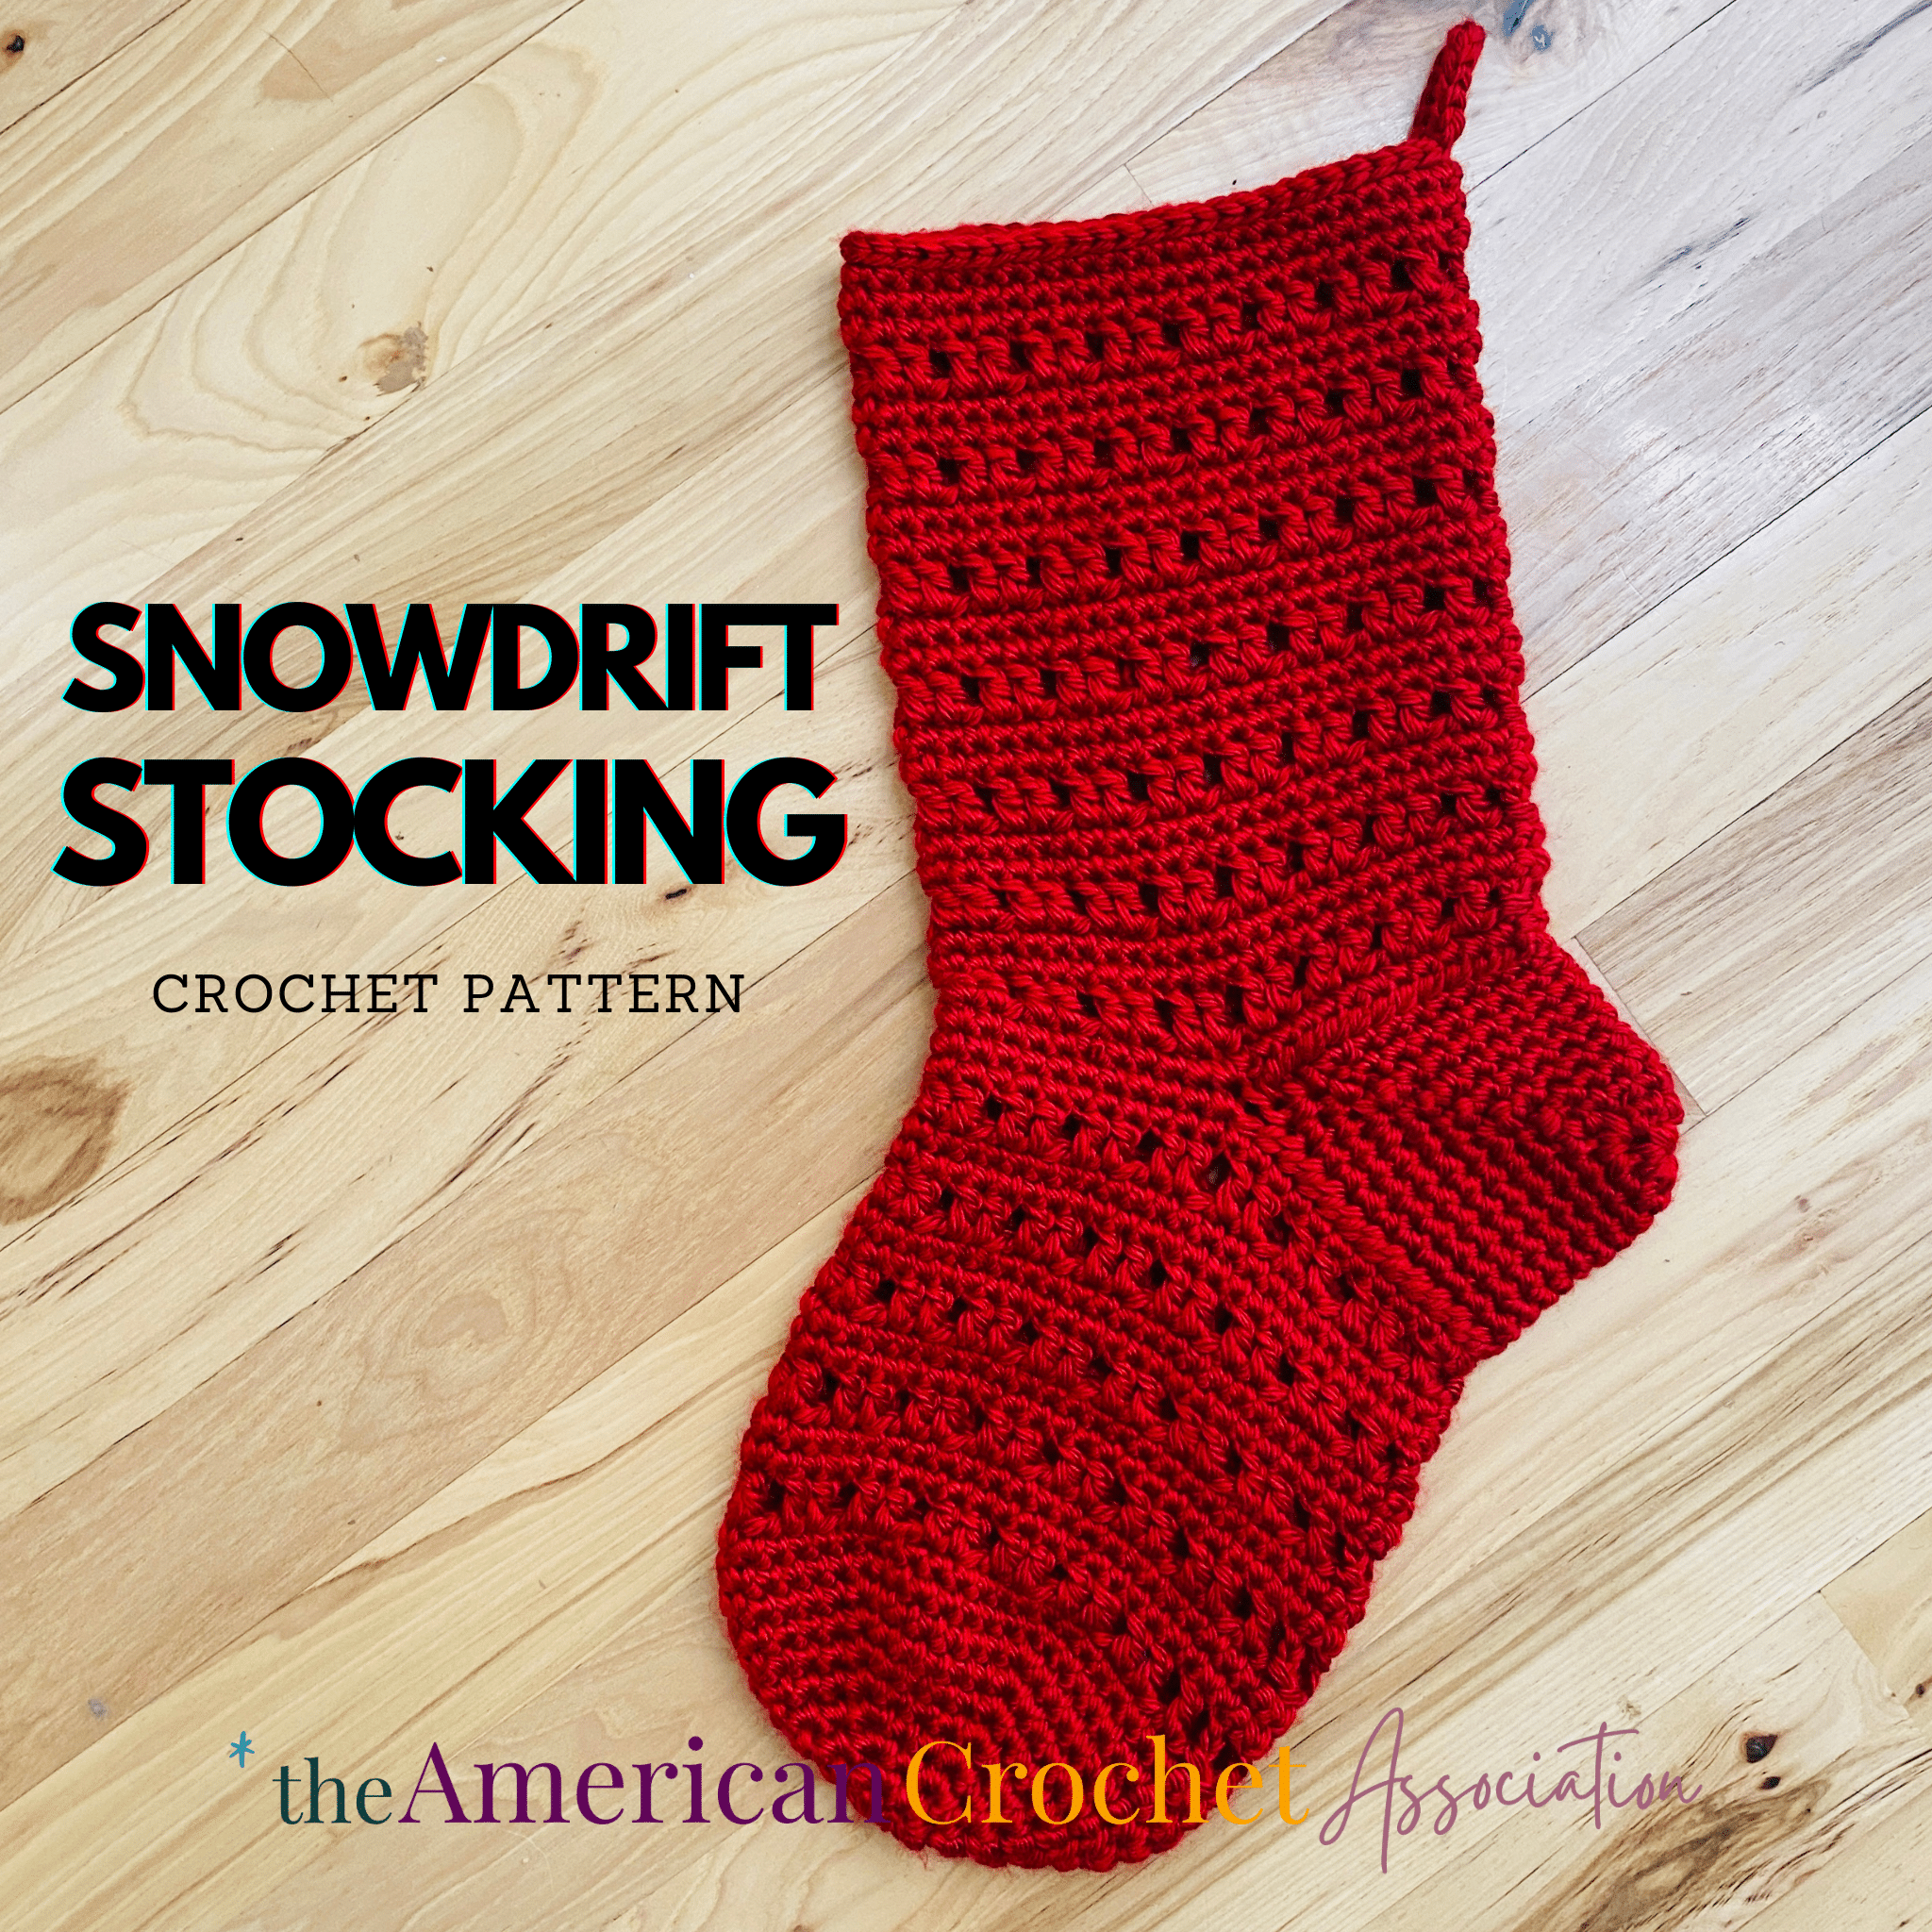
Snowdrift Crochet Stocking
Quick and Easy Crochet Stocking
By working in joined rounds using only basic stitches (single, chain, double), you’ll be able to quickly work through each step of this crochet stocking pattern.
While this pattern is beginner friendly, crochet experts will also appreciate the simple rhythm and meticulous detail.
Each step is carefully outlined from start to finish, removing any guesswork or confusion as you navigate through the pattern.
Just work through each section with ease when you double-check your stitch work with the final stitch counts noted at the end of each step. Easy!
Simple enough for a beginner to follow, with simplicity that an experienced crocheter will appreciate, this crochet stocking will quickly become your new favorite holiday decoration.
If you love to crochet for the holidays, check out these other crochet stocking patterns right here on our website:
Granny Stitch Crochet Stocking Pattern
Noel One Piece Crochet Stocking Pattern
Two Piece Crochet Stocking Pattern
The Snowdrift Crochet Stocking pattern begins in joined rounds at the toe, then works up to the cuff in one solid piece.
This design intentionally leaves a gap for the heel.
The heel is created in joined rounds too, but as a separate piece that is crocheted and then attached as the final step.
If you need help or have any questions about how and where to attach the heel, just use our helpful picture when you get to that part of the instructions.
Selecting The Best Yarn
Worsted and Super Bulky Yarn
An interesting feature in this crochet stocking pattern is that it can be worked in any yarn you choose.
Yes, you can use any yarn!
To show just how different your yarn choices can be I created two samples:
Sample 1: Knit Picks Dishie Cotton (cream)
Knit Picks Dishie is a cotton yarn in the weight 4 size category.
The finished size with this yarn is 11″ around (5.5″ flat) x 15″ in total length.
Cotton is a great yarn because it is durable, and works up beautifully for home decor, especially in the creamy off-white color chosen.
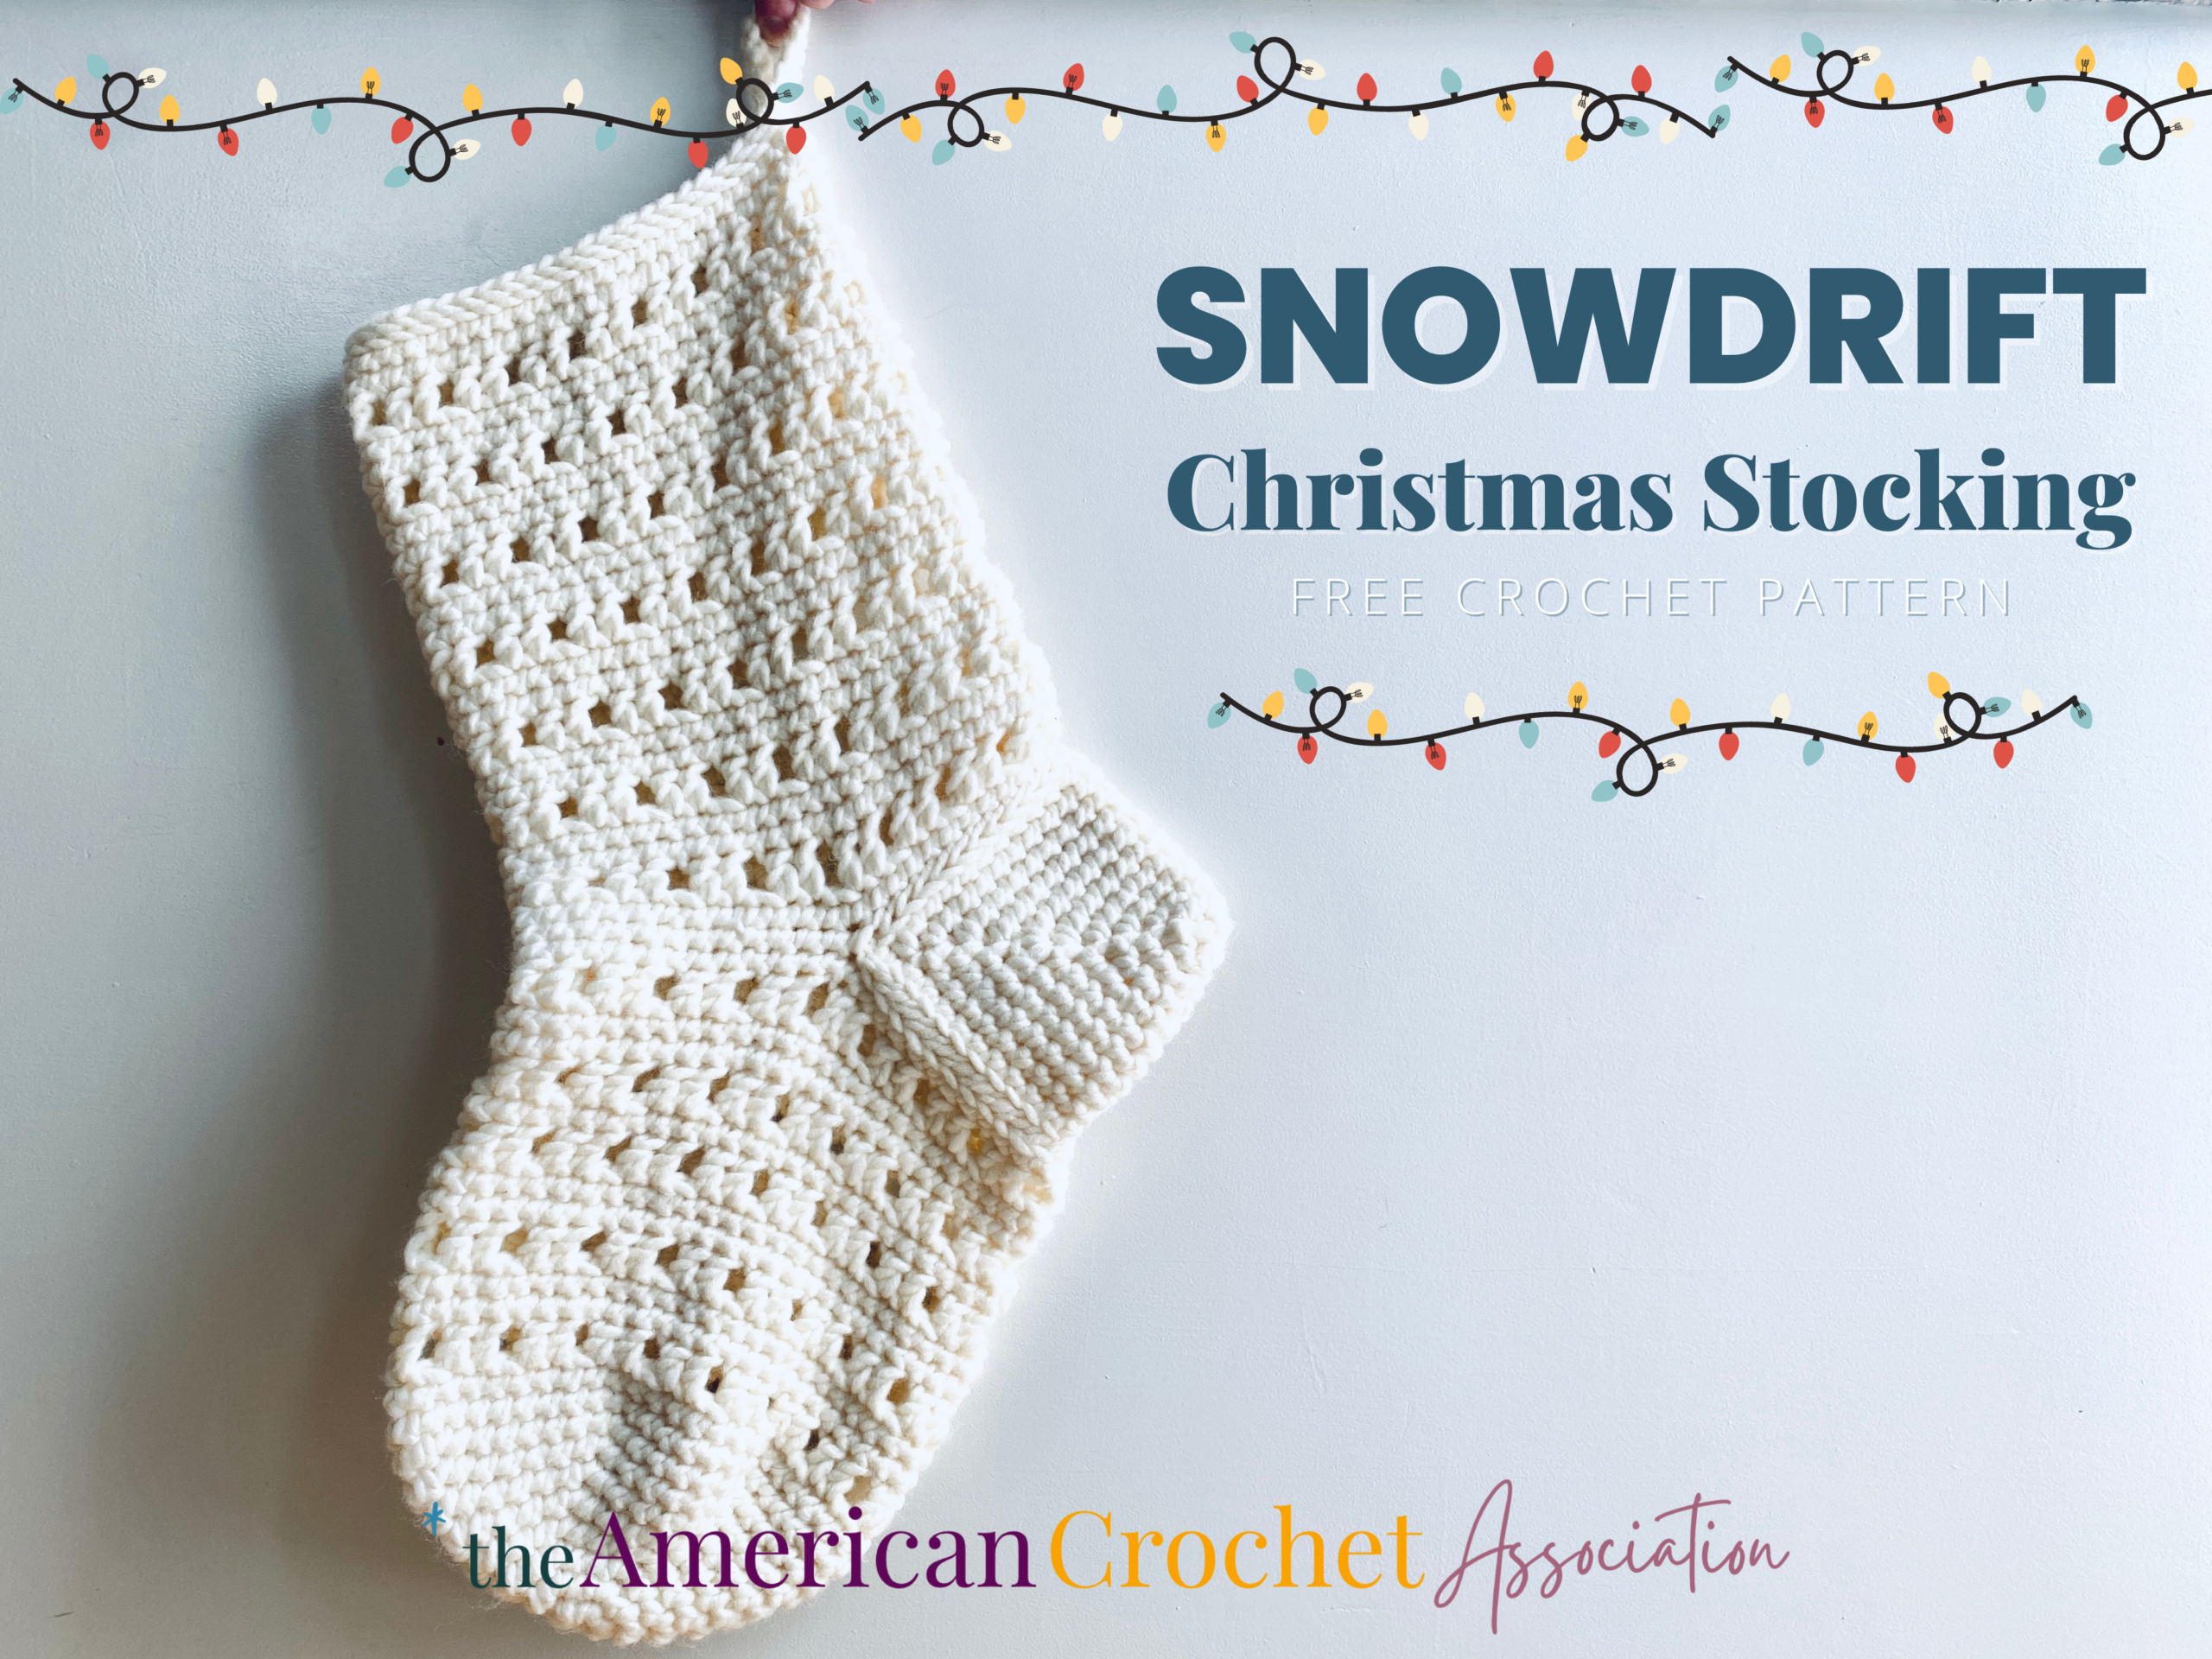
Sample 2: Lion Brand Yarn Hometown (Red)
Check out our Crochet Memberships for all skill levels!
From First Stitch to Crochet Career, Unravel Your Complete Journey With The American Crochet Association!
Lion Brand Yarn Hometown is an acrylic yarn in the super bulky weight 6 size category.
The finished size with this yarn is 17.5″ around (8.25″ flat) x 25.5″ in total length.
Acrylic is a great yarn for home decor because is is also superbly durable; The bulky weight of this yarn makes a jumbo stocking that can be filled with lots of goodies.
Crochet Calculator
If you want to try other yarn weights, and you’re not quite sure how the finished project will measure up, I have a simple crochet calculator to help.
Designed for hat sizes, this calculator shows you how to measure fabric worked in rounds of crochet so that you can easily find the finished circumference (around).
To give this calculator a try as you choose the perfect yarn for your crochet stocking, click here: Crochet Hat Size Chart and Calculator
Crochet Resources
Crochet Stocking Inspiration
To get some inspiration from other crocheters around the world, check out all the finished Snowdrift Crochet Stocking projects that have been completed and added to Ravelry: https://www.ravelry.com/patterns/library/snowdrift-christmas-stocking-2/people


Tips To Work In Joined Rounds
When working in joined rounds of crochet, you might not be sure where your first and last stitches of each round are.
I’ve got some tips that will help!
By using a stitch marker in the top of your stitch for each new round, then moving it when you create the first stitch in each new round, you’ll have an easier time keeping track of your work.
This article shares some tips about what counts as a stitch in crochet, and also notes where stitch markers go when working in rounds: Does the chain count as a stitch in crochet? How to count crochet stitches!
Right and Wrong Sides
Including the heel of this crochet stocking, the entire fabric of this project has a very clear “right side”.
Because single crochet stitches look very different from the right side (front) and wrong side (back), it is important to keep the right side of this fabric showing on the outside.
Starting with the toe of this crochet stocking, be sure to note the “right side” so that you don’t accidentally turn that to the inside.
To learn more about right and wrong sides in crochet (so that you can learn to spot the differences in crochet fabric) here are some tips that will help: Right and Wrong Sides in Crochet: What does this mean?
Policy For Individual Use
This crochet pattern is designed by Salena Baca Crochet for the American Crochet Association.
Pattern instructions are protected by copyright laws.
Users must acknowledge and respect the intellectual property rights of pattern creators and designers as follows:
- This pattern is for personal use only. Pattern instructions may be accessed and used by individuals for personal, non-commercial purposes only. Users may create finished products based on the pattern instructions for personal use or gifting.
- Users may not reproduce, distribute, modify, or create derivative works of pattern instructions without explicit permission from the copyright holder.
- Selling or commercially exploiting products made from pattern instructions will require additional permissions or licensing from the copyright holder.
- It is unlawful to share or distribute pattern instructions in any way, including but not limited to: print, digital, video.
- It is unlawful to create derivative works based on pattern instructions, including but not limited to translations, adaptations, or variations.
- Users should provide proper attribution when sharing or displaying finished products made using these pattern instructions, giving credit to the original pattern creator and source.
- Users are expected to conduct themselves in an ethical and respectful manner when using pattern instructions. Users should not engage in plagiarism, claim others’ work as their own, or misrepresent the origin of pattern instructions.
By accessing and using pattern instructions, individuals agree to abide by the usage policy herein.
Users may be held responsible for any damages or legal liabilities resulting from their non-compliance with this policy.
Purchase a PDF File on Ravelry
Click Here to purchase a downloadable PDF version of this pattern!
Making The Crochet Stocking
Yarn
Knit Picks Dishie Cotton worsted weight #4 yarn (100% Cotton; 190 yds/173 m per 3.5 oz/100 g skein): Swan x 1 skein
Hook And Other Materials
- US Size H8/5.00 mm Hook
- Measuring Tape
- Yarn needle
Gauge
- 24 pattern Sts = 5.5”
- 12 pattern rows = 4”
Finished Size
- 11” around (5.5″ when fabric is flat)
- 15” long
Stitch Key
- Ch(s) = chain(s)
- Sc = single crochet
- Dc = double crochet
- Sl St = slip stitch
- St(s) = stitch(es)
Specialty Stitches and Techniques
- Adjustable Loop
- Sew = Using a yarn needle to join fabric pieces together.
- BLO = Back Loops Only.
Pattern Notes:
- Crochet Stocking pattern is worked in sections: Toe (joined rounds, toe up), Heel (joined rounds, sewn on last).
- This Crochet Stocking pattern may be worked in yarn weights and types as desired. Finished size will vary.
- Figure 1 of this Crochet Stocking Pattern shows: Ending round 24, starting round 25.
Snowdrift Christmas Stocking Instructions
Toe
- Round 1 (Right Side): Form adjustable loop, Ch 1 (not a St, here and throughout), work 6 Sc into loop, Sl St to join – 6 Sc
- Round 2: Ch 1, work 2 Sc into each St around, Sl St to join – 12 Sc
- Round 3: Ch 1, [Sc into 1 St, work 2 Sc into following St] 6 times, Sl St to join – 18 Sc
- Round 4: Ch 1, [Sc into next 2 Sts, work 2 Sc into following St] 6 times, Sl St to join – 24 Sc
- Round 5: Ch 1, [Sc into next 3 Sts, work 2 Sc into following St] 6 times, Sl St to join – 30 Sc
- Round 6: Ch 1, [Sc into next 4 Sts, work 2 Sc into following St] 6 times, Sl St to join – 36 Sc
- Round 7: Ch 1, [Sc into next 5 Sts, work 2 Sc into following St] 6 times, Sl St to join – 42 Sc
- Round 8: Ch 1, [Sc into next 6 Sts, work 2 Sc into following St] 6 times, Sl St to join – 48 Sc
- Round 9-10: Ch 1, work 1 Sc into each St around, Sl St to join – 48 Sc
- Round 11: Ch 3 (first Dc), Dc into next St, Ch 1, skip 1 St, [Dc into next 2 Sts, Ch 1, skip 1 St] around, Sl St to join – 48 Sts; 32 Dc + 16 Ch
Repeat rounds 9-11 until 24 rounds are complete (ending on a round 9 repeat).
- Skip 12 Sts, place 1 St marker (rejoin here in Round 25; Figure 1). Fasten off.
- Next round creates a Heel Gap of 24 total Sts, keeping seam along side of Stocking.
Heel Gap (Figure 1)
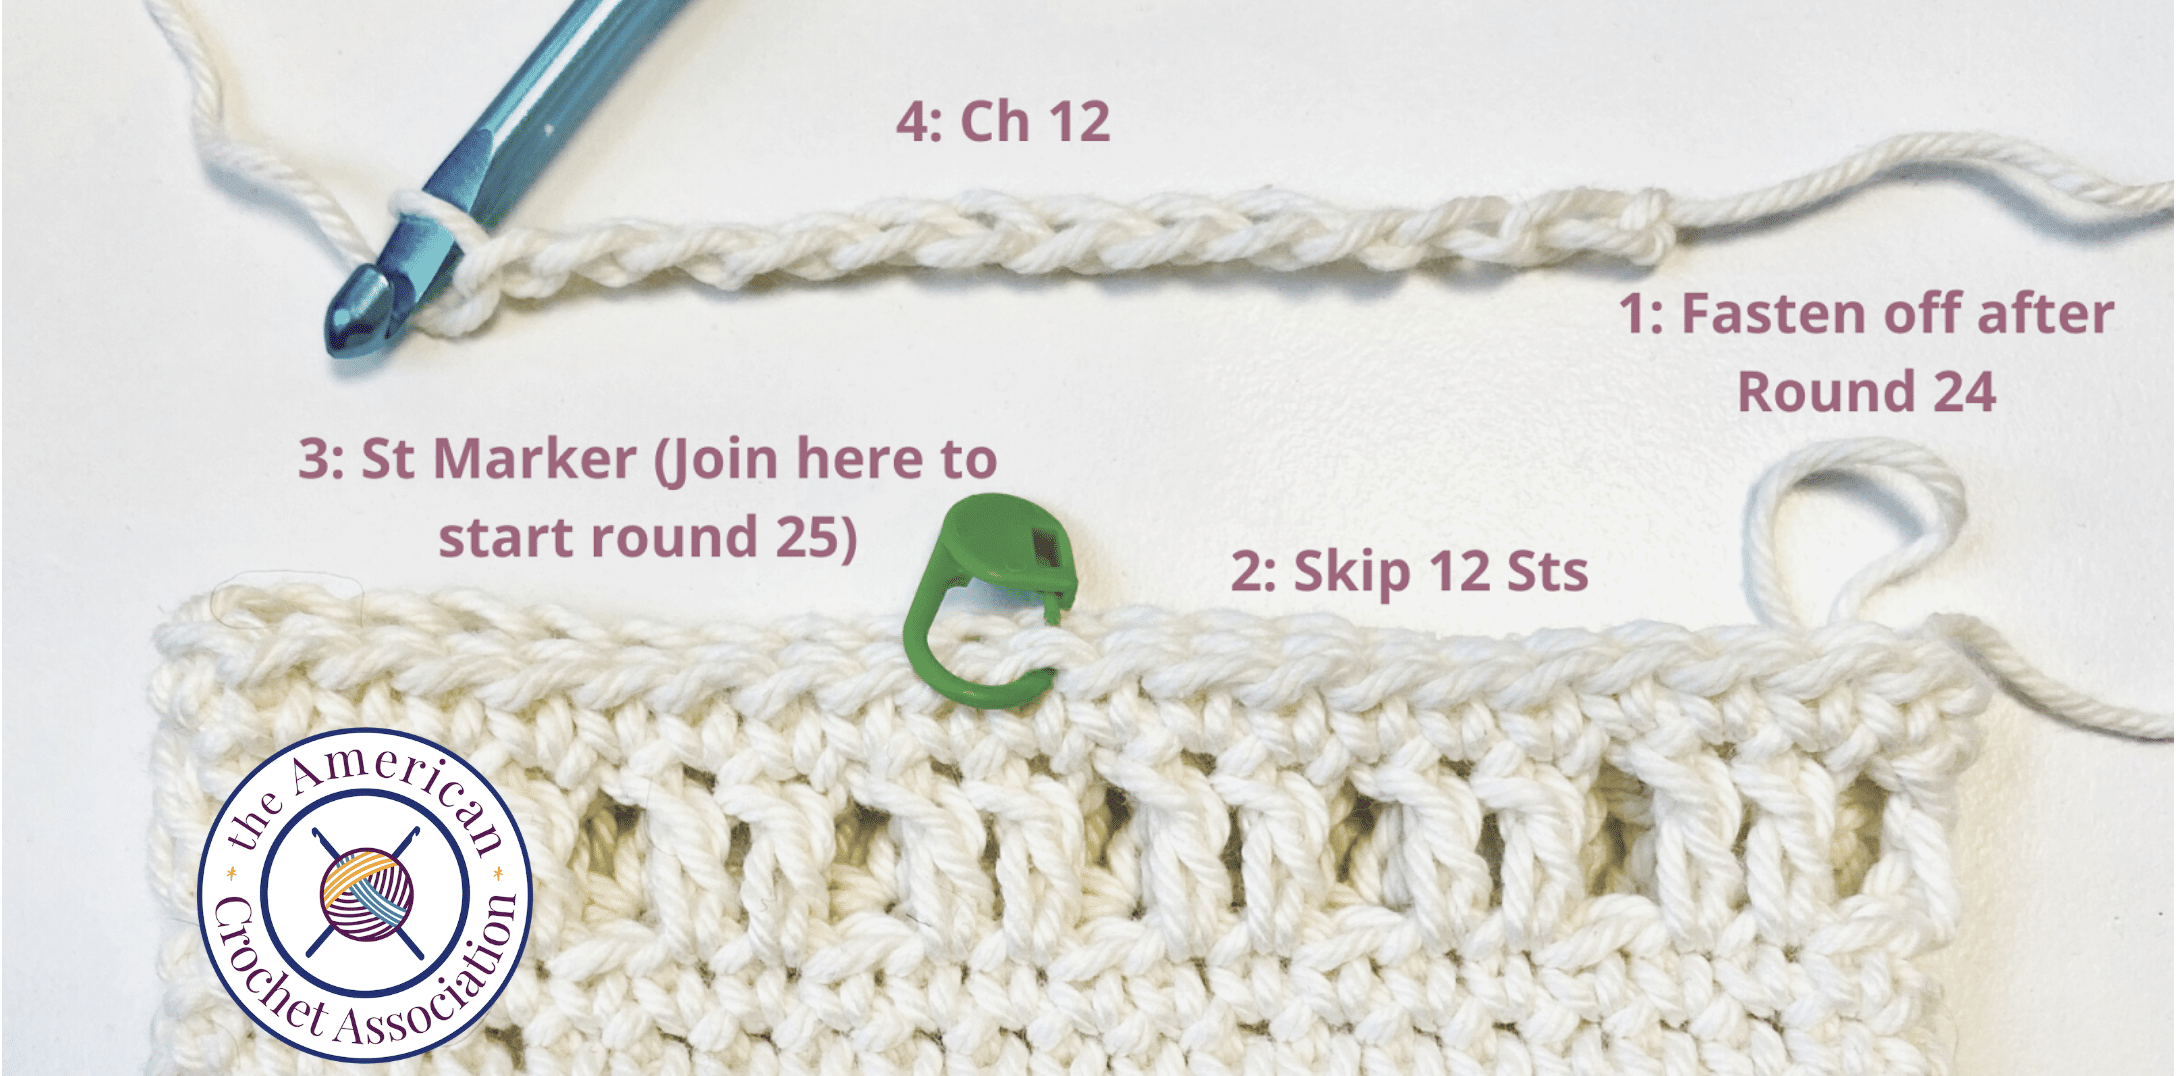
- Round 25: Ch 12 (Heel Gap), Sc into marked St and next 23 Sts, Ch 12, skip 12 Sts (Heel Gap), Sl St to join – 48 Sts; 24 Ch + 24 Sc
- Round 26: Ch 1, work 1 Sc into each St around, Sl St to join – 48 Sc
- Repeat rounds 9-11 (starting with Round 11), until 47 rounds are complete (ending on a round 10 repeat).
- Round 48: Ch 1, work 1 Sc into each St around, Ch 12, Sl St to join – 60 Sts; 48 Sc + 12 Ch
- Round 49: Sl St into BLO of each St around, fasten off – 60 Sl Sts
Heel
- Round 1 (right side): Form an adjustable loop, Ch 1 (not a St, here and throughout), [(Sc, Ch 1, Sc), 2 Sc] 2 times, Sl St to join – 10 Sts; 8 Sc + 2 Ch
- Round 2: Sl St into Ch-1 space, Ch 1, [(Sc, Ch 1, Sc) into Ch-1 space, Sc into next 4], 2 times, Sl St to join – 14 Sts; 12 Sc + 2 Ch
- Round 3: Sl St into Ch-1 space, Ch 1, [(Sc, Ch 1, Sc) into Ch-1 space, Sc into next 6], 2 times, Sl St to join – 18 Sts; 16 Sc + 2 Ch
- Round 4: Sl St into Ch-1 space, Ch 1, [(Sc, Ch 1, Sc) into Ch-1 space, Sc into next 8], 2 times, Sl St to join – 22 Sts; 20 Sc + 2 Ch
- Round 5: Sl St into Ch-1 space, Ch 1, [(Sc, Ch 1, Sc) into Ch-1 space, Sc into next 10], 2 times, Sl St to join – 26 Sts; 24 Sc + 2 Ch
- Round 6: Sl St into Ch-1 space, Ch 1, [(Sc, Ch 1, Sc) into Ch-1 space, Sc into next 12], 2 times, Sl St to join – 30 Sts; 28 Sc + 2 Ch
- Round 7: Sl St into Ch-1 space, Ch 1, [(Sc, Ch 1, Sc) into Ch-1 space, Sc into next 14], 2 times, Sl St to join – 34 Sts; 32 Sc + 2 Ch
- Round 8: Sl St into Ch-1 space, Ch 1, [(Sc, Ch 1, Sc) into Ch-1 space, Sc into next 16], 2 times, Sl St to join – 38 Sts; 36 Sc + 2 Ch
- Round 9: Sl St into Ch-1 space, Ch 1, [(Sc, Ch 1, Sc) into Ch-1 space, Sc into next 18], 2 times, Sl St to join – 42 Sts; 40 Sc + 2 Ch
- Round 10: Sl St into Ch-1 space, Ch 1, [(Sc, Ch 1, Sc) into Ch-1 space, Sc into next 20], 2 times, Sl St to join – 46 Sts; 44 Sc + 2 Ch
- Round 11: Sl St into Ch-1 space, Ch 1, [(Sc, Ch 1, Sc) into Ch-1 space, Sc into next 22], 2 times, Sl St to join, fasten off 30” tail – 50 Sts; 48 Sc + 2 Ch
With Right Side of Toe and Heel facing outward, align Heel into Heel Gap so that Ch-1 spaces from Heel are touching Sc row ends from Round 25 (evenly into Heel Gap).
With 30” tail from heel, evenly sew Heel into Heel Gap. Fasten off.
Finishing
Sew in all yarn ends, trim excess.
Video Chat
To learn more about the Snowdrift Christmas Crochet Stocking pattern from the author, Salena Baca, watch this quick video chat:
Click Here to share your finished project in our community!
Peace + Love + Crochet
Salena

This stocking is SO ADORABLE! I love Christmas Stocking patterns. They make great gifts, and this works up quickly.
so cute, looking forward to making this
This is a great pattern! I had fun making the stocking on the pattern test.
I wasn’t interested in crocheting stockings but this one is so cute. I’m going to start this after I finish my Christmas presents. I’m going make these to replace my bought stockings for next Christmas.
stocking is a quick and easy project that adds the perfect Christmas charm to our house!
I just finished the Evergreen stocking and now I need to start this one. They are both so nice and roomy, perfect for big stocking stuffers. Thank you
I plan to start this pattern in the morning! I’m so tempted to climb out of bed and grab my hook and yarn right now…..he he 😄 I just may do that…… Depending how quick it is to make, I want to make several. Thanks for this fun festive pattern Salena. Merry Christmas 🎄
Beautiful pattern! I haven’t made this one yet, but I did make another one of your stocking patterns, which were just as lovely!
Thanks, as always, for all your wonderful insight and continued support, Salena! Happy Holidays (and to everyone else, as well)! 🙂
I can’t wait to start on this project in the week ahead. This pattern looks really easy and fast to make so I can send them out to my grandkids filled with stuff. 🙂 Thank you for having an easy Christmas stocking that can be made at the last minute.
Very elegant stocking! love the laciness!
This looks like such a fun pattern! I can’t wait to try it with super chunky yarn! I want to be able to give it to a pregnant friend who is due around Christmas for a newborn photo shoot! I think this will work perfectly!!!
Looking forward to trying this pattern. Have not made a stocking before, however working with your patterns in the past gives me confidence to try something new.
A cute quick project for this busy time of year. One could make various sizes using different weight yarns. Thank you for sharing free patterns!
This pattern is fun and simplistic. I love how my stocking turned out.
This stocking is soooo cute. I can’t wait to try it. I have a new grandson on the way, and I will be making him and his big brother matching stocking with this pattern. As a matter of fact, I may have to make this for a few team members at work.
i haven’t yet started working on this pattern, but the design is so stunning and the pattern seems simple to follow. i’m so stoked to try this out 🙂
Thank you!
This is a beautiful stocking and am so excited to try it. Beautiful 💜!!