Affiliate Disclosure: This post may contain affiliate links, which means the American Crochet Association may earn a small commission from qualifying purchases made through links on our site, at no additional cost to you. Learn more on our Disclosures and Disclaimers page.
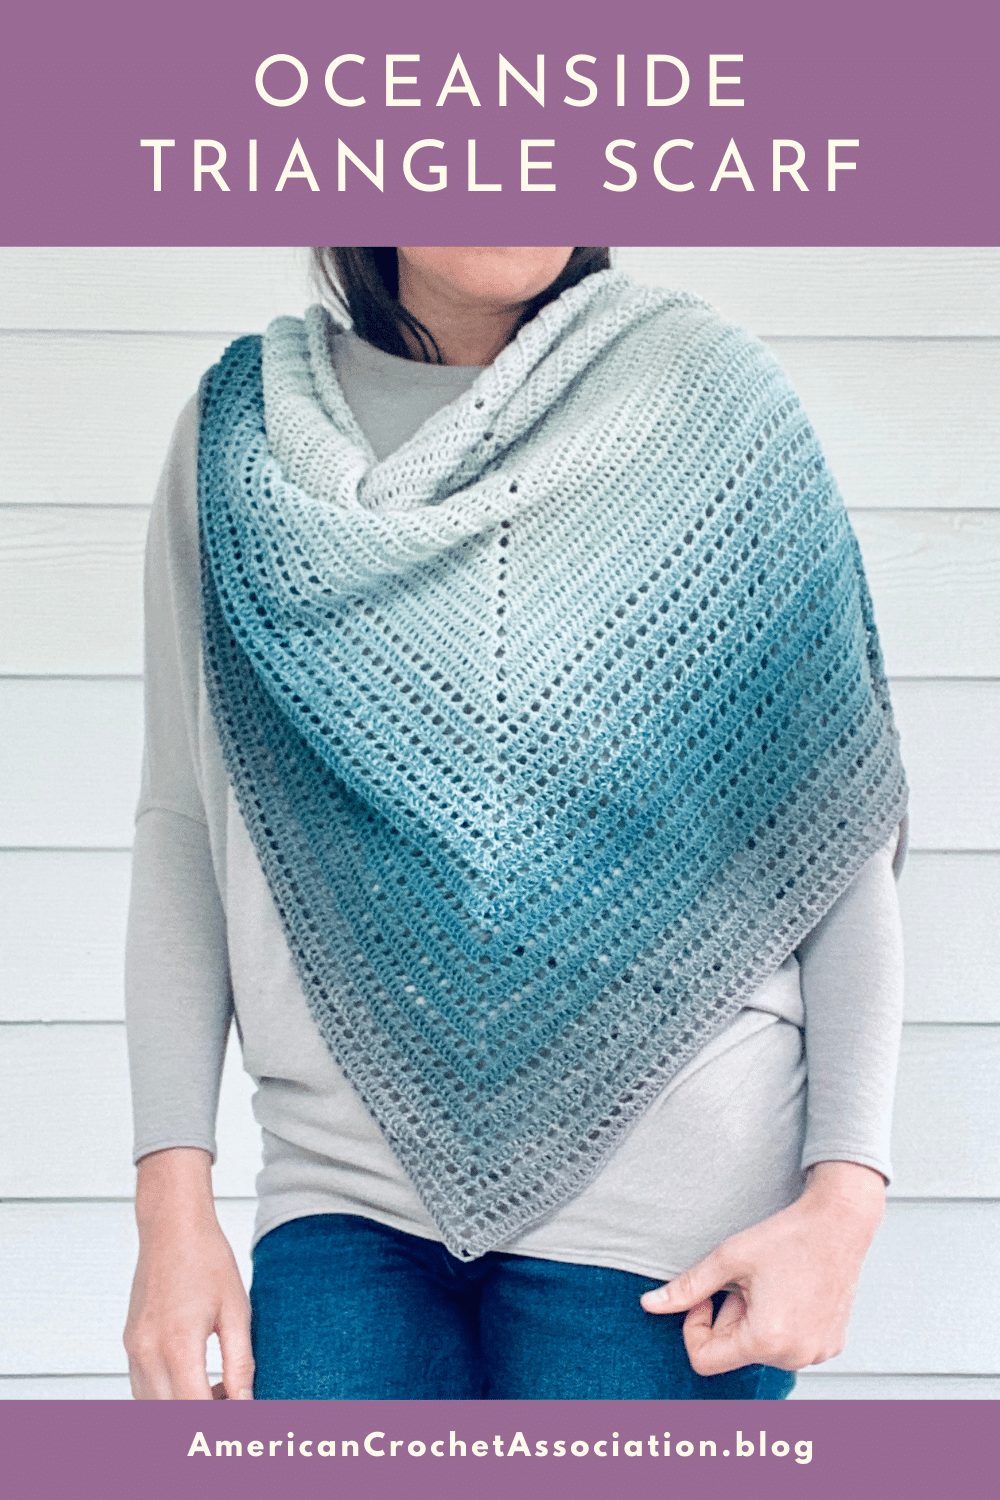
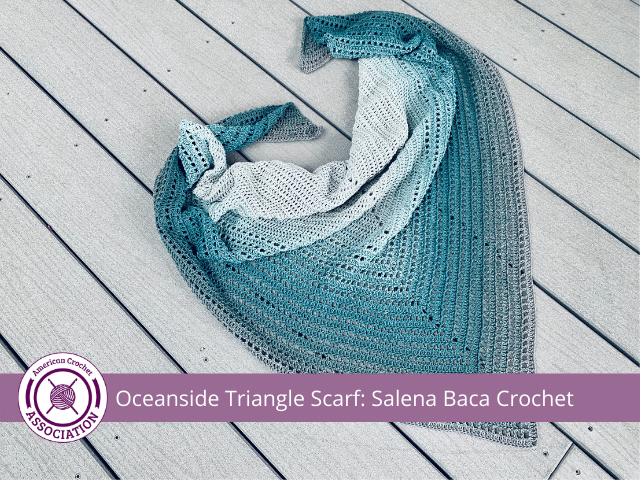
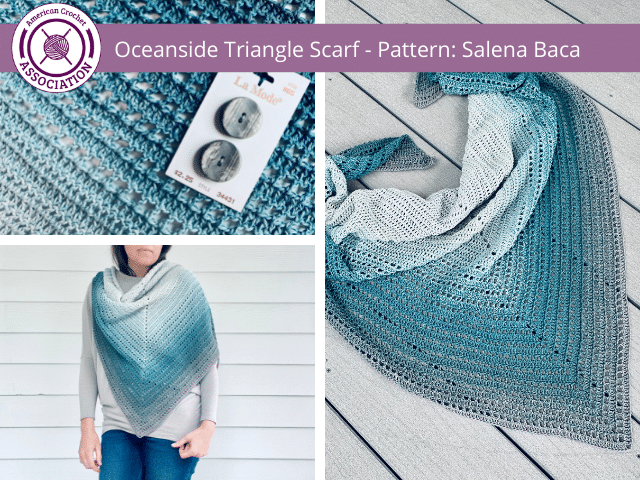
This Oceanside Crochet Triangle Scarf pattern is easily worked with simple stitches to quickly create a classic looking accessory to wear!
This crochet triangle scarf pattern is worked in rows using chains and double crochet stitches.
You can easily customize the size of the crochet triangle scarf by adding or omitting rows, and the simple pattern repeat makes this design fun and easy to work up!
An interesting difference in this scarf pattern are the button and loop added to the corner ends of the last row worked – the button attaches to the loop, which helps to keep the scarf around your neck!
The Oceanside Crochet Triangle Scarf is a great pattern to work up because:
- Scarves are quick and fun projects to work up!
- Have fun with yarn color to make this simple fabric your own style; color blocking, stripes, ombre, variegated and more!
- This project works great with cotton yarns, and plant-based fibers!
- You’ll get to practice a lot of crochet skills: increasing in rows, stitch tension, gauge & size, blocking, finishing techniques & more!
Estimated reading time: 4 minutes
Table of contents
This post may contain some affiliate links.
Policy for Individual Use
Pattern Designed By: Salena Baca Crochet. This pattern is copyright protected; it is unlawful to distribute this pattern in any form (free, sale or trade).
Click Here to purchase a downloadable PDF version of this pattern!
Crochet Triangle Scarf – Resources
Finished Crochet Triangle Scarf Projects
Need some inspiration? Check out other finished crochet triangle scarf projects on ravelry today, right here:

Yarn
Scheepjes Sunkissed, Fingering Weight #2 yarn (100% Cotton; 186 yds / 10 m per 1.75 oz / 50 g skein).
- Color A: Pistachio Ice, 2 skeins
- Color B: Oceanside Ice, 1 skein
- Check for yarn substitutes!
Materials
- US F/5 (3.75mm) crochet hook
- Scissors
- Yarn needle
- 1.5” Button
Gauge
20 Dc Sts = 4”, 10 Dc Rows = 4”
Size
46” Wide x 25” Tall (center point)
Specialty Stitches and Techniques
Stitch Key
- Ch(s) = chain(s)
- Sc = single crochet
- Dc = double crochet
- Sl St = slip stitch
- St(s) = stitch(es)
Pattern Notes
- Video: How To change color in rows (change color as desired).
- This pattern can be altered by repeating row 2 with an odd row count until at least 40” are created. Then, follow remaining pattern instructions and measure as you go for desired size.
Oceanside Crochet Triangle Scarf – Instructions
With Color A, form an adjustable loop.
Check out our Crochet Memberships for all skill levels!
From First Stitch to Crochet Career, Unravel Your Complete Journey With The American Crochet Association!
Row 1 (Right Side): Ch 3 (first Dc, here and throughout), work 4 Dc into loop, Ch 3, work 5 Dc into loop – 10 Dc, 1 Ch-3 space
Row 2: Ch 3, turn, Dc into same St, work 1 Dc into each St until 2nd Ch of Ch-3 space is reached, (Dc, Ch 3, Dc) into 2nd Ch, work 1 Dc into each St until 1 St remains, work 2 Dc into last St – 16 Dc, 1 Ch-3 space
Rows 3 – 33: Repeat Row 2, increasing the St count by 6 Dc for every row completed and ending with a total St count of 202 Dc + 1 Ch-3 space.
Fasten off Color A, attach Color B.
Row 34: Ch 3, turn, Dc into same St, Ch 1, skip 1 St, *Dc into next St, Ch 1, skip 1 St*. Repeat from * to * until 1st Ch met, (Dc, Ch 3, Dc) into 2nd Ch, Ch 1, skip 1 St, repeat from * to * until 1 St remains, work 2 Dc into last st – 208 Sts; 106 Dc, 102 Ch + 1 Ch-3 space
Rows 35, 37, 39, 41: Repeat Row 2.
Rows 36, 38, 40: Repeat Row 34.
Finishing
Row 1: Ch 15, Sl St into 1st ch (button hole), turn to work across ends of rows, work 2 Dc into last st of Row 41, (Dc, Ch 1, skip 1 st) around each Dc end row across, work 2 Dc into 1st St of Row 41. Fasten off leaving a 10” tail.
Attach button with 10” yarn tail.
Sew in all ends.
Click Here to share your finished project in our community!
Peace + Love + Crochet
Salena