
Affiliate Disclosure: This post may contain affiliate links, which means the American Crochet Association may earn a small commission from qualifying purchases made through links on our site, at no additional cost to you. Learn more on our Disclosures and Disclaimers page.
If you’re looking for a flexible and beginner-friendly crochet bandana pattern, this one is a must-make.
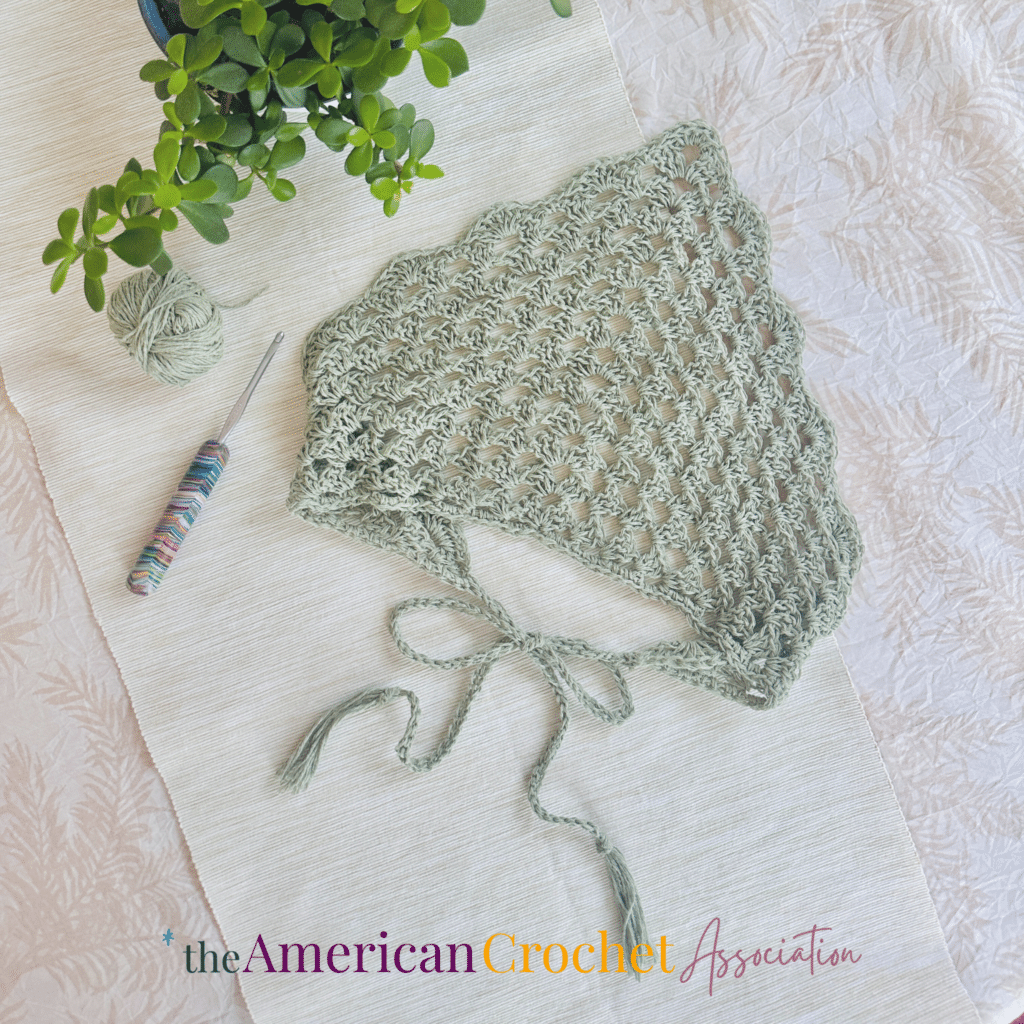
The Granny Triangle Bandana is a measure-as-you-go design that you can work up in any yarn and with any hook size—making it one of the most adaptable crochet bandana patterns you’ll ever try.
This project is worked in one piece, starting from the center and growing outward in easy rows of granny stitch.
No complicated shaping or sewing—just soothing stitches and a classic look that stays in style.
The best part? You can make it in just the size you need.
Use the size guide provided (from 16″ for toddlers to 24″ for adult large), or simply measure as you go for a perfect fit.
Whether you use cotton for a summer accessory or wool for winter coziness, this crochet bandana pattern works beautifully with any yarn in your stash.
It’s a great go-to project for gifts, craft fairs, or just treating yourself.
So grab your favorite yarn and hook, and let’s make a crochet bandana that fits you just right!
Estimated reading time: 8 minutes
Table of contents
This post may contain some affiliate links.
Policy for Individual Use
This crochet bandana pattern was designed by Salena Baca Crochet for the American Crochet Association.
Pattern instructions are protected by copyright laws.
Users must acknowledge and respect the intellectual property rights of pattern creators and designers as follows:
- This pattern is for personal use only. Pattern instructions may be accessed and used by individuals for personal, non-commercial purposes only. Users may create finished products based on the pattern instructions for personal use or gifting.
- Users may not reproduce, distribute, modify, or create derivative works of pattern instructions without explicit permission from the copyright holder.
- Selling or commercially exploiting products made from pattern instructions will require additional permissions or licensing from the copyright holder.
- It is unlawful to share or distribute pattern instructions in any way, including but not limited to: print, digital, video.
- It is unlawful to create derivative works based on pattern instructions, including but not limited to translations, adaptations, or variations.
- Users should provide proper attribution when sharing or displaying finished products made using these pattern instructions, giving credit to the original pattern creator and source.
- Users are expected to conduct themselves in an ethical and respectful manner when using pattern instructions. Users should not engage in plagiarism, claim others’ work as their own, or misrepresent the origin of pattern instructions.
By accessing and using pattern instructions, individuals agree to abide by the usage policy herein.
Users may be held responsible for any damages or legal liabilities resulting from their non-compliance with this policy.
Purchase a PDF File on Ravelry
For a copy of this crochet bandana pattern, you can purchase a downloadable PDF version on Ravelry.
Crochet Bandana Pattern Resources
Finished Crochet Bandana Pattern Projects
Need some inspiration before you get started on this crochet project?
Check out other finished crochet bandana patterns on ravelry today, right here:

More Crochet Bandana Patterns
If you love the look of this Crochet Bandana, here are a few more crochet accessory patterns you can view on our website:
One Piece Bulky Yarn Crochet Headband and Cowl Pattern
Half Circle Crochet Scarf – Beginner Friendly Pattern
How to make this Crochet Bandana Pattern
Yarn
Knitting for Olive Pure Silk, Super Fine Fingering weight #1 yarn (100% Silk; 273 yds/250 m per 1.75 oz/50 g ball): Dusty Artichoke, 1 skein
This Crochet Bandana pattern was made with a fingering weight yarn in 100% natural fibers.
To find other natural fibers, or other brands that carry yarn like Knitting for Olive, I suggest looking on yarnsub.com and comparing the yarn used to write this pattern.
While you can easily substitute yarn for this project, I really enjoyed working with Knitting for Olive Pure Silk to give this project softness and drape.
Plus, it comes in over 30 gorgeous colors and is less than $10 per skein (remember, you can make any size bandana with less than 1 skein)!
Check out our Crochet Memberships for all skill levels!
From First Stitch to Crochet Career, Unravel Your Complete Journey With The American Crochet Association!
Silk can be a sturdy fiber with a nice weight to it, so the fabric it creates is perfect for a crochet bandana like this one.
If you choose to substitute yarn, think about the fabric you’re creating and be careful not to create fabric that is too fragile (you want the crochet ties to hold a bit of friction without trouble).
You can read more about how to substitute yarn, including my best tips to choose yarn alternatives, right here: Understanding Yarn Substitution – An Easy Reference For Crocheters
If you would like to substitute yarn for this project, here are some fingering weight yarns I recommend from crochet.com:
Materials
Use a hook that best fits your yarn choice, or creates the type of fabric you would like to create (tight and firm or loose with lots of drape).
The sample pictured in this crochet bandana pattern was made with a US size H/8 5.00 mm crochet hook.
Gauge
Size is customizable for any yarn and hook size you choose; This pattern is a “measure as you go” style.
To learn more about gauge and size in crochet, here are some helpful tips: How To Crochet a Swatch.
Finished Sizes and Measurements
Head Circumference / Width of Triangle = Approximate size by age.
- 16” = 2-5 years
- 18” = 5-12 years
- 20” = Teen
- 22” = Adult
- 24” = Adult Large
- 16” = 2-5 years
- 18” = 5-12 years
- 20” = Teen
- 22” = Adult
To learn more about measuring for the best size and fit (especially for something worn around the head), here are some helpful tips: Crochet Hat Size Chart and Calculator.
Stitch Key
This crochet stitch pattern is worked with the following basic crochet stitches.
You can see these stitches in action as you watch our video tutorials (just click on the underlined text):
- Sl St = slip stitch
- Ch(s) = chain(s)
- Sc = single crochet
- Dc = double crochet
- St(s) = stitch(es)
Specialty Stitches & Techniques
- BLO = Back Loop Only
- Shell = Work 7 Dc Sts into the same space.
- Adjustable Loop
With so many different places and spaces to work in crochet, it can be easy to wonder where you should place your hook to work specialty stitches.
Here are some tips and resources to help: Where Does My Hook Go in Crochet?
Pattern Notes
- Bandana worked in one piece, from the center outward, in parts: Bandana (rows), Ties (rows).
- To measure for your desired fit:
- Width (Head Circumference): Use a fabric tape measure to wrap around head, starting at center of forehead. Choose a Bandana size that matches this measurement or up to 4” smaller, depending on your preferred fit and style.

Granny Triangle Crochet Bandana Pattern Instructions
Bandana
- Row 1: Form adjustable loop, Ch 4 (first Dc + Ch-1 space), (3 Dc, Ch 3, 3 Dc, Ch 1, Dc) into loop – 13 Sts; 8 Dc + 2 Ch-1 spaces + 1 Ch-3 space
- Row 2: Ch 4 (first Dc + Ch-1 space), turn, (3 Dc, Ch 1) into next Ch-1 space, (3 Dc, Ch 3, 3 Dc) into Ch-3 space, (Ch 1, 3 Dc) into next Ch-1 space, (Ch 1, Dc) into top of last St in row – 21 Sts; 14 Dc + 4 Ch-1 spaces + 1 Ch-3 space
- Row 3: Ch 4 (first Dc + Ch-1 space), turn, (3 Dc, Ch 1) into each Ch-1 space across side, (3 Dc, Ch 3, 3 Dc) into Ch-3 space, (Ch 1, 3 Dc) into each Ch-1 space across side, (Ch 1, dc) into top of last St in row – 29 Sts; 20 dc + 6 Ch-1 spaces + 1 Ch-3 space
Repeat Row 3 (increasing by 6 double crochet stitches and 2 chain-1 spaces with each new row), until the bottom edge of your triangle reaches your desired width.
End on an odd-numbered row — this ensures the shell edging will align correctly. Do not fasten off. Continue to Border.
Border
- Row 1 (Right Side): Ch 1 (not a St), turn, Sc into Ch-1 space, *Shell into next Ch-1 space, Sc into next Ch-1 space.* Repeat from * to * across side. Shell into Ch-3 space. Sc into next Ch-1 space. Repeat from * to * across side.
Do not fasten off. Continue to Ties.
Ties
The length of your ties should be about 16” each.
With your yarn and hook size, create a chain that is at least 3” longer (19” total – it will shrink once you Sl St over it).
- Row 1: *Create a 19” long Ch, Ch 5 more, skip 5 (space for tassel), Sl St into BLO of remaining Chs (1 tie formed)*. Rotate, to work across bottom edge of Bandana rows. Work 3 Sc into side of each row. Repeat from * to * one time. Fasten off.
Finishing
Tassels (Make 2, creating 1 for each Ch-5 space on Tie):
- 1 Bundle = Cut 10 strands of yarn, each 5” long.
- Fold Bundle in half evenly.
- Insert a crochet hook through Ch-5 space from Tie, pull folded center of Bundle through to create a loop.
- Pull loose ends of Bundle through loop, then tighten to form a knot.
- Trim tassel ends evenly.
Sew in all ends, trim excess.
How to wear this Crochet Bandana
Wondering how to tie and wear a Crochet Bandana?
Here’s a quick video demonstration from the author Salena Baca showing you how to wear this crochet bandana.
YouTube: Crochet Bandana Pattern
Click Here to share your finished project in our community!
Peace + Love + Crochet
Salena


Hi Selena,
First, I just want to say how pretty your Granny Triangle Crochet pattern is!
I got started on it a couple of days ago and I ran into a road block. At the end of row 2 it says to (Ch1, DC) into top of last St in row. Could you please be more specific? I can see that I’m crocheting in a “V” formation, but as far as I can see, there’s just a hole at the end of row two and I’m not clear on where to put that DC. Thank you for your time!
Sincerely,
Corinne
Thank you for your kind words, and reaching out! This pattern increases at the beginning and ending of each row, so it is important to note what counts as a stitch and where to place stitches. Stitch markers will help, and here are some tips to use them: https://americancrochetassociation.blog/how-to-count-crochet-stitches/ Enjoy!